
A litter box can look well finished yet leak at the hood joint or develop a sticking drawer once assembled. Quality inspection checks those interactions as well as the molded parts themselves. The checks below cover tray fit, leakage, drawer motion, new-product odor, accessible edges and packing, with different setups for open, hooded and drawer-style boxes. They address physical construction; powered mechanisms need their own safety scope. Results should be judged against the approved model and specified test conditions.
Start with These Six Litter Box Checks
| Check | What to do | How to judge it |
|---|---|---|
| Tray fit | Check rocking and dimensions; assemble the hood, latches and door, then repeat under the specified litter load. | Meet drawing tolerances and approved engagement; no unacceptable rocking or distortion. |
| Leakage | Test basin holding separately from relevant joint and splash paths, using a dry exterior and defined liquid conditions. | No liquid escape at the paths covered by the specified method; identify the first wet location. |
| Drawer motion | Compare the assembled drawer bare and with the intended liner; repeat with the defined load and cycles. | Seat and remove as specified without binding, unintended release or force beyond the agreed limit. |
| Odor | Compare unpacked components and packaging under the same conditioning method. | Meet the agreed reference or odor criteria; investigate an unusual result without identifying chemicals by smell. |
| Edge finish | Examine entrances, rims, pulls and accessible undersides using a safe agreed method. | Meet the defect criteria for flash, rough gate remnants, cracks and accessible sharp edges. |
| Packing | Verify contents and restraints; inspect the product after the applicable packed-product test. | Correct packout and labels; no damage or functional change outside the specification. |
A basin that holds liquid may still leak at an assembled joint, while a drawer can bind because of its liner rather than its guide. Separate observations help a supplier investigate the right part or setup instead of treating every wet surface or sticking drawer as the same defect.
Start With the Approved Litter Box and Test Conditions
The inspection brief should define both the expected product and the conditions under which it will be judged. Give the inspector the current drawing, approved reference sample, material declaration, component list, assembly instructions, and packaging specification. Resolve differences between the drawing and sample before the visit; otherwise, a factory can reproduce the sample while missing the intended dimensional requirement.
For an open box, focus on the basin, rim, base stability, and handling points. An enclosed box adds hood-to-tray engagement, latches, door movement, and the liquid path at the perimeter joint. A drawer-style box adds guide clearance, stops, seating position, and compatibility with any supplied liner. A removable tray is not automatically a waste drawer: describe which part holds litter, which collects waste, and how each is removed.
Agree the sampling plan and separate allocation for time-consuming or destructive checks. Inspection-standard guidance helps align defect terminology; the product specification still supplies the fit, load and leakage limits.
Check Tray Fit and Deformation Before Adding Liquid
Inspect tray fit first because deformation can change both the liquid path and the clearance around moving parts. Place the empty basin on the agreed flat surface and observe rocking, lifted corners, or a bowed base. Measure the specified dimensions from the drawing’s reference points rather than choosing convenient points that hide the distortion.
Assemble the hood, rim, latches, door, and drawer as supplied. Look for uneven perimeter engagement, a latch that closes only under unusual pressure, and a door that rubs against its frame. Photograph the mismatch in the assembled position and again after separation. This distinguishes a molded-shape problem from a component fitted in the wrong orientation.
Repeat the relevant fit checks under the intended litter or equivalent agreed load. A flexible tray may sit flat while empty but deflect when filled; a hood may look aligned until the basin’s loaded shape changes. Record the load, support surface, and assembly state so the buyer can compare results. Do not turn an inspector’s subjective impression of “too flexible” into a failed tolerance unless the approval criteria support it.
Separate Basin Leakage From Joint and Splash Failures
Leakage can come through the basin itself, bypass a tray-to-hood joint, or escape through an opening during use. Those are different paths. A basin holding-liquid check can reveal a crack or an opening below the test level, but it cannot establish that a higher perimeter joint redirects liquid into the tray. Record the basin, joint, and splash checks separately instead of calling one water result “leakproof.”
For the basin check, use the approved liquid, fill level, duration, and support condition. Start with a dry exterior and a method that makes escape visible without confusing spilled test liquid with leakage. Document the first wet location, not just a wet floor at the end. An unexplained wet result should be repeated under a controlled setup before the buyer decides whether it is a product defect or a handling error.
For an enclosed box, examine overlap direction and discontinuities at corners, latches, and the entrance. If the buyer’s intended-use assessment calls for a joint-path test, apply liquid at the defined location with the product assembled. Keep this distinct from deliberately overfilling the basin: overfilling may challenge a different condition from the one the product is designed to manage.
Construction matters. PetSafe Original support describes a plastic lining in its disposable trays as leak protection. That identifies a control for those trays, not a requirement for every litter box. Inspect the actual basin, liner, or seal specified for the purchased model, and keep a simulated splash check within the buyer-approved method.
Test Drawer Motion With the Intended Liner and Load
Test a drawer both bare and with the intended liner or bag correctly installed. If resistance appears only after adding the liner, inspect folds, overhang, and trapped material before blaming the guide geometry. If the bare drawer also binds, examine distortion, guide contact, misassembly, or an obstruction. This comparison narrows the correction without assuming that every drawer symptom has the same cause.
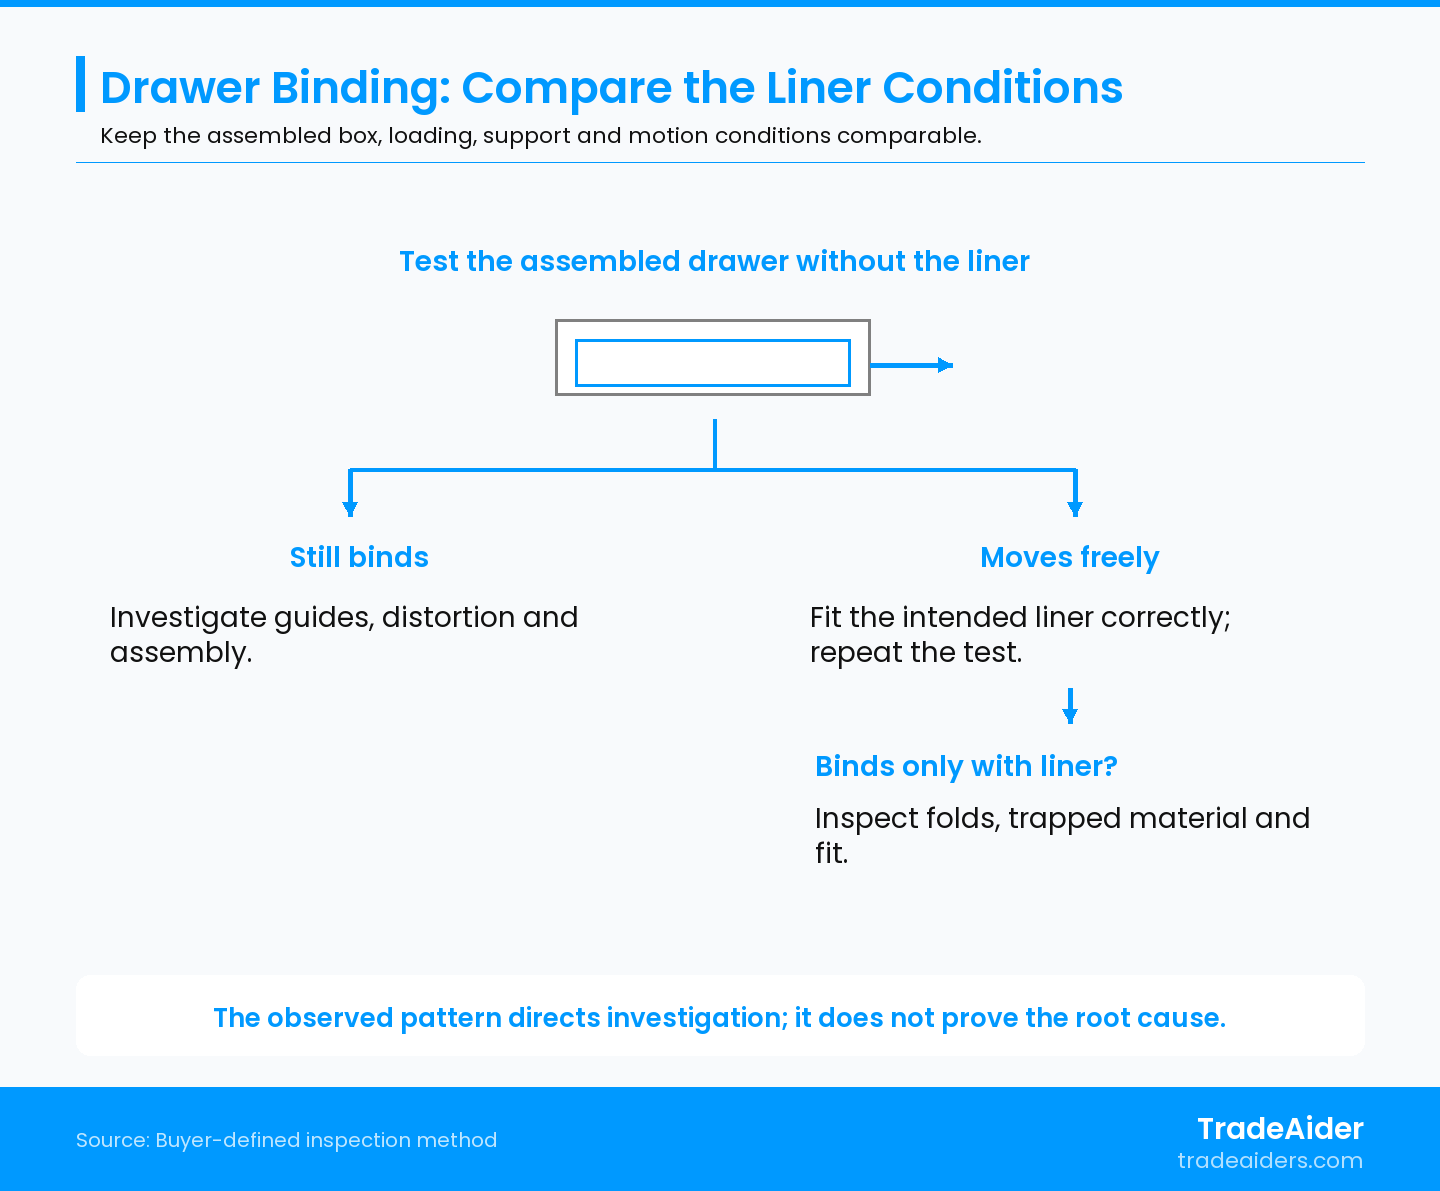
Compare bare and correctly lined conditions under the same setup. Persistent binding and liner-dependent binding lead to different investigations, without proving a cause.
Follow the approved insertion and removal direction. Record where motion changes: at initial entry, midway through travel, or near the fully seated position. Verify stops and retention features without forcing the drawer past its designed travel. Under the agreed load and repeated-motion conditions, check whether the drawer stays seated and whether the surrounding body distorts. Numeric force and cycle limits belong in the buyer’s test plan.
Manufacturer instructions illustrate why setup needs control. Whisker drawer assembly guide describes smooth insertion with the step securely attached and the liner properly fitted. It is evidence about those models; a different drawer can use a different engagement arrangement.
The Whisker liner-installation guide also warns that a bag extending above the drawer sides can produce a false drawer-full indication on the listed models. This is a setup-dependent indication, not proof of a mechanical jam. If dimensional or molding defects recur during manufacturing, consider a during-production inspection while correction can still affect the remaining production.
Treat Odor and Edge Finish as Separate Checks
New-product smell and unsafe contact edges require different evidence. Odor screening can identify an unusual condition for investigation; edge inspection can locate a physical contact hazard or workmanship defect. Neither should be hidden inside a single “appearance acceptable” result.
Screen New-Product Odor Without Claiming Chemical Safety
Use a documented odor-screening method with agreed unpacking and conditioning conditions, a reference where available, and consistent observation language. Distinguish odor from the plastic component, packaging, adhesive, liner, or added fragrance. Record what was observed and where; avoid diagnosing a chemical from smell alone. An objectionable difference can justify a buyer hold pending investigation.
Factory screening does not prove chemical safety, identify a substance, or validate long-term odor-control performance with waste. Material declarations and any destination-market laboratory requirements need their own evidence. A filter being present also does not establish its claimed service life or odor-removal performance.
Cleaning instructions can change the evaluation conditions. PetSafe cleaning guidance calls for mild soap and water, complete drying, and avoiding strong-smelling cleaners for its frame. Do not use that procedure as a universal instruction for another material or mechanism. Follow the purchased model’s approved care method when checking cleaning access and reassembly.
Inspect Contact Edges and Cleaning Surfaces
Inspect the entrance, rim, handle recesses, latch areas, scoop holder, drawer pull, and accessible underside for sharp edges or projections. On molded parts, look for flash, which is excess material at a molding boundary, as well as rough gate remnants and cracked corners. On metal components, inspect exposed cut edges and the continuity of any folded or protected edge.
Use an agreed safe examination method; do not slide a bare hand along a suspected sharp edge. Record the contact location and the condition, then classify it against the buyer’s defect list. A small cosmetic mark and an accessible cutting edge should not receive the same response simply because both are visible.
Also inspect cleaning access. Can the user remove the intended components without breaking a clip? Are there crevices, rough surfaces, or inaccessible pockets that conflict with the approved design or cleaning claim? An inspection can document these construction features and demonstrate removal and reassembly. It cannot promise that every user will clean the box correctly or that a surface will remain odor-free indefinitely.
Check Packaging, Then Repeat the Functional Checks
Inspect packaging as part of the product system. Verify the component count, liner or filter quantity where supplied, instructions, SKU labels, barcode artwork, carton marks, and the packing arrangement. Look for contact points that press on a tray wall, latch, hood, or drawer guide. An intact carton can still contain a distorted product.
Use the approved restraints and separators, especially where components nest together. Compare the actual packing to the signed-off pack layout rather than accepting an improvised arrangement that happens to close. Photograph the unpacking sequence and any damage before rearranging the contents, so the record preserves the likely contact or movement path.
Record the carton revision, inserts and component orientation. Use ordinary production packing, not a reinforced demonstration sample. Preserve the product and its inserts after unpacking: a bowed guide alongside an insert pressure mark can suggest where contact occurred, although the mark alone does not prove the cause.
Choose the packed-product test for the distribution route. The ISTA procedure directory distinguishes non-simulation integrity screens from general transport simulations. A factory drop demonstration does not become an ISTA test merely because the package was dropped; use the applicable procedure, equipment and reporting conditions.
ISTA also explains that its tests concern a specific packaged-product system, rather than approval of an individual packaging material. After the agreed test, recheck tray fit, leakage paths, and drawer movement. This reveals functional damage that a carton-only assessment can miss. Separately, use the AQL calculator to work through agreed sampling inputs. AQL means acceptance quality limit; a sampling setting does not define a leak-test protocol.
Record the Failure and Check the Correction
Record the sampled unit, setup, criterion and failure location. A supplier investigating a drawer jam needs to know where resistance starts and whether it persists without the liner; a photograph labeled “drawer failed” gives too little information. Classify the finding under the agreed defect rules and retain the unit for comparison with the correction.
Illustrative Scenario: A Drawer Problem Limited to One Packing Run
Consider an illustrative order of 2,400 drawer-style litter boxes, with a 600-unit packing run identifiable from carton records. During the agreed inspection, drawers from that run resist closing. The bare drawer moves freely outside the body, but an assembled guide remains bowed after unpacking. Proper liner installation does not remove the resistance. These are hypothetical observations, not TradeAider client results.
In this illustrative example, the buyer treats packing pressure as a working explanation and asks the supplier to verify it against the pack contact points and production records. Because the affected packing run is traceable, the buyer holds those 600 units pending correction. The remaining goods still need their own acceptance evidence; identification of one affected group does not automatically clear every other carton. If the records cannot reliably separate the goods, the proposed narrow hold loses its basis.
The supplier changes the restraint and contact arrangement, sorts distorted units, and repacks representative corrected products. Reinspection repeats assembled fit and drawer motion, then checks the relevant liquid paths after the agreed packed-product test. Release depends on those results meeting the documented criteria. A new carton insert or one smoothly moving drawer does not show that the affected production units now meet those requirements.
Prepare a Product-Specific Inspection Brief
Before booking, send the SKU drawing, approved sample reference, component list, test conditions, packing plan and known product changes. Confirm which checks the inspector can perform on site and arrange any laboratory work separately. Name the person who will resolve an unspecified limit or an unacceptable result.
Pre-Shipment Inspection is a final-stage inspection before shipment release. To plan a Pre-Shipment Inspection, use TradeAider’s published readiness context: 100% of the order quantity complete and at least 80% packed for export. The packing threshold does not mean production can be unfinished.
Contact TradeAider to scope the inspection with those product and packing documents. Agree the checks and reporting scope before booking so the resulting findings can be compared with your release criteria.
Frequently Asked Questions
Can a water test prove that the assembled litter box is leakproof?
A water test supports only the tested liquid path and conditions, so an assembled litter box needs separate checks for relevant joints and splash paths. A clean basin result does not cover liquid directed onto a hood joint or an entrance opening. Record the setup and limitations, and avoid extending a controlled test result into an unrestricted marketing claim.
Should an inspector approve a strong-smelling litter box after airing it?
Airing alone does not establish acceptability when the odor differs from the approved sample or when the buyer’s documented conditioning method has not been followed. Compare products under the same conditions and record whether the smell comes from the box or its packaging. If acceptability remains unresolved, the buyer should decide the next investigation rather than treating odor reduction as chemical clearance.
Does a passing sample confirm that every litter box will work?
A passing sample does not prove every litter box conforms, and the buyer still needs the agreed lot-sampling plan and any separate functional-test coverage. Keep sampled units representative of the identified shipment rather than accepting hand-picked demonstration pieces. For a known recurring failure, ask whether the corrective-action verification and affected-scope checks adequately address it before relying on a new passing sample.
Do automatic litter boxes need the same inspection scope as manual models?
Automatic litter boxes need additional product-specific safety and operating checks beyond this manual-box inspection guide, including the controls and protection functions applicable to their design. Electrical, moving-part, sensor, software, and market-compliance questions cannot be cleared by tray fit and drawer motion alone. Agree a separate risk-based test scope with appropriately qualified support, and do not use a live animal to challenge an unverified mechanism.
Related Articles
Grow your business with TradeAider Service
Click the button below to directly enter the TradeAider Service System. The simple steps from booking and payment to receiving reports are easy to operate.