
A kids scooter order needs an inspection plan for its actual construction and intended user, not a generic report carrying the word “toy.” A two-wheel kick scooter, a lean-to-steer design and a fixed-stem model can have different connections and applicable assessments. Buyers should resolve that classification before treating a supplier's test values as suitable for the order.
The inspection matrix below covers steering alignment, folding locks, brakes, wheel retention, deck load and labels on non-powered kick scooters. It helps purchasing and quality teams commission the right checks and interpret changes after testing. Smooth rolling or a straight-looking handlebar is not enough: the critical question is whether the relevant connections and functions remain within their requirements.
Kids Scooter Inspection Test Matrix
Use the matrix to agree the methods, sample quantities, equipment and sequence for the ordered scooter. Results should identify the model and test stage, including any separate specimens required by the method. A scooter damaged by one test should not silently become the specimen for an unrelated comparison.
CheckWhat to doWhat determines the resultSteering alignmentCheck the neutral position, steering travel and connections before and after the specified test.Approved geometry, steering function and permitted relative movement.Folding lockFollow the folding sequence; check full engagement and retention after cycling.The model's locking requirements and prescribed retention method.BrakeCheck actuation, braking performance and release with the defined load and surface.Specified stopping or braking criterion, conditions and repeatability.Wheel retentionInspect axle hardware, wheel movement and attachment after the required sequence.Retention, clearance and damage limits in the applicable method.Deck loadApply the prescribed load at the stated positions and inspect during and after testing.Deflection, permanent deformation, cracks and functional requirements.LabelsMatch the scooter, instructions, retail box and production markings.Approved age, rider mass, warnings, assembly information and destination requirements.
ASTM lists ASTM F2264-14(2019) as an active specification for non-powered scooters, covering performance, test methods and labeling for children ages 5 years and older. That stated age scope matters when a supplier offers a report for a younger child's model. Confirm which requirements apply rather than extending the report by changing its age description.
A missing test value is a preparation gap, not permission to choose a convenient load at the factory. Obtain the method and acceptance criterion from the responsible technical reviewer. If the required equipment or conditions are unavailable, report the check as unperformed and arrange the appropriate assessment.
Resolve the Product Classification and Report Coverage
Match the intended user and destination with the wheel arrangement, steering mechanism, folding joint, height adjustment, brake and rider-mass claim. These details determine whether an offered laboratory report is relevant. A shared trade name or housing appearance is not a technical basis for extending coverage to another construction.
The published scope of ASTM F963-23 excludes non-powered scooters and directs readers to F2264. Do not assume that a generic toy report covers a scooter within that exclusion. This does not remove other applicable children's-product obligations or decide the classification of every scooter-like ride-on product.
For European classification, NEN's EN 14619:2019 scope distinguishes sports equipment from domestic-use toys in the 20 kg to 50 kg user group, with the latter addressed by EN 71-1. Rider mass alone therefore does not settle the test route. Have the technical reviewer confirm the intended use, classification and relevant edition before approving numerical limits.
The procedures below are finished-goods inspection guidance. Formal strength, durability and braking assessments still require the prescribed fixtures, specimens and conditions. Agree which checks can be performed during the factory visit and which need a laboratory or another suitably equipped test facility.
Distinguish Normal Steering from Slip at a Connection
A steering result should identify the assembled configuration and handlebar height, then distinguish the intended motion from unwanted movement at a connection. For a conventional two-wheel model, the handlebar, front wheel and deck provide useful references. Binding or interference is a separate function finding, even if the initial alignment looks correct.
Use the design's neutral position for a lean-to-steer scooter. Its front wheels can change direction as the steering assembly tilts; that intended movement must not be confused with a loose joint. Compare both sides with the approved geometry and check the return action only if the design specifies one. A straight-looking T-bar is not a complete assessment of the linkage underneath.
Relative movement is the key distinction in a steering-connection result. When the prescribed fixture restrains the fork, the part holding the front wheel, a changed handlebar-to-fork orientation indicates slip at their connection. Normal steering moves the connected assembly together. Require a valid before-and-after reference so ordinary turning is not misreported as looseness, or slip concealed by simply rotating the bar back.
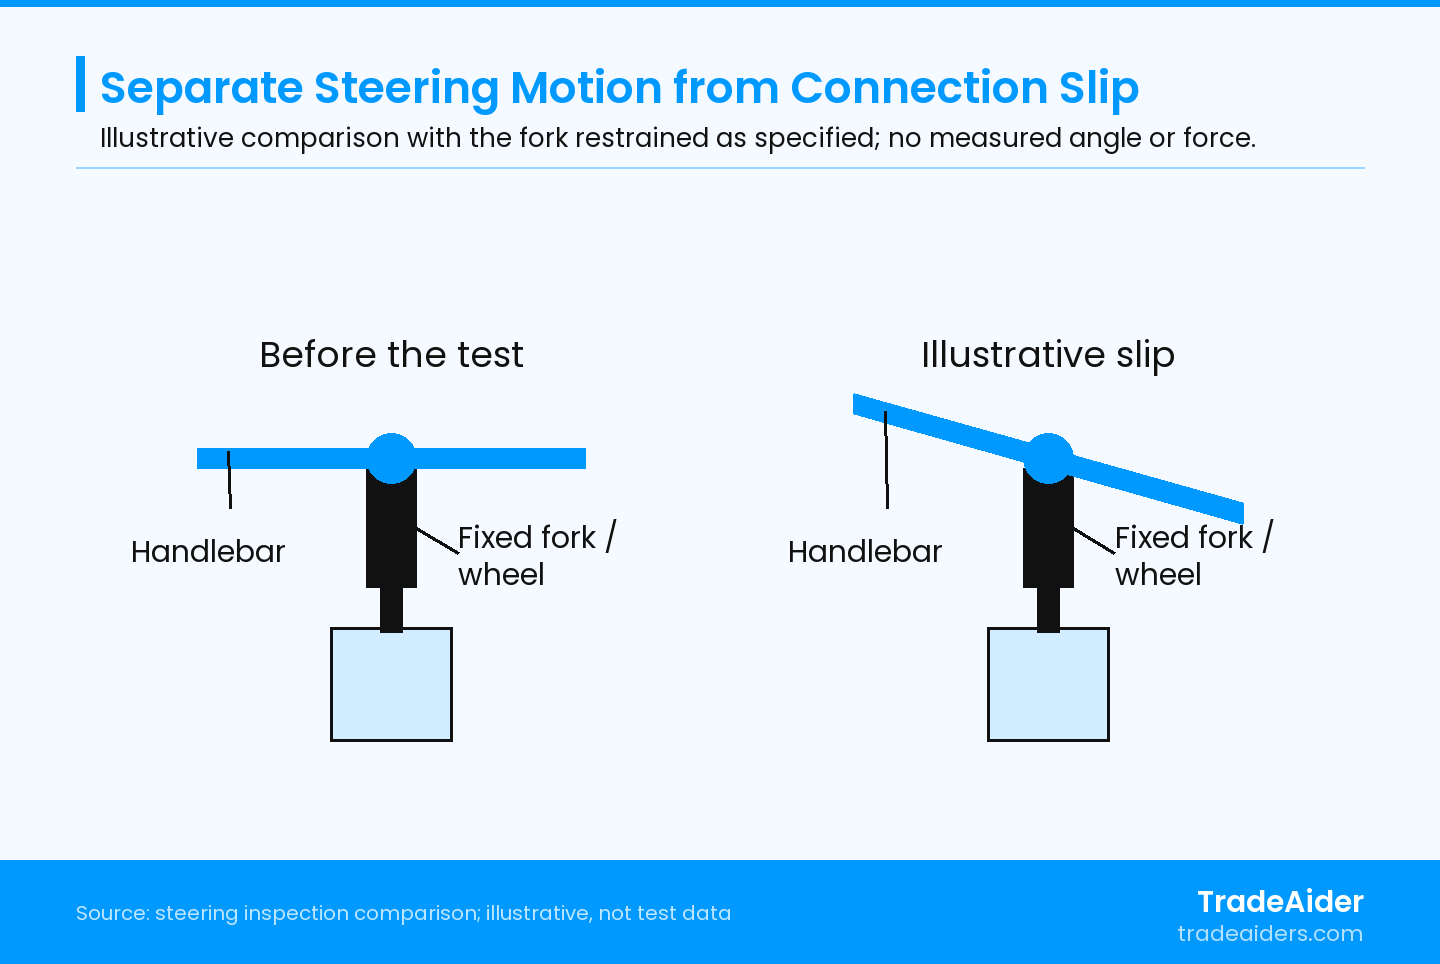
Illustrative top views of a conventional two-wheel steering connection, not measured test results. The fork stays in the same restrained position while the handlebar changes orientation. Follow the actual fixture and acceptance method; this does not represent lean-to-steer geometry.
Record initial adjustment and fastener settings. Do not tighten a connection immediately before photographing a failed result. If retightening is part of the permitted assembly procedure, record that step and distinguish the original finding from the later condition. A successful retest after adjustment does not establish that unadjusted retail units were supplied correctly.
A short tracking check can reveal a persistent pull or wheel interference, but use a suitable level area and the agreed procedure. Floor slope, surface irregularities and how the scooter is guided can affect the path. Treat an unexplained deviation as a finding to investigate rather than diagnosing a bent fork from the path alone.
A Closed Lever Does Not Establish a Secure Folding Joint
For a folding design, require confirmation that the intended latch, pin and any secondary restraint engage and remain secure through the prescribed sequence. A lever lying against the stem or an audible click does not by itself prove engagement. A fixed-stem model instead needs its actual attachment and adjustment locks assessed.
Look for interference from paint buildup, burrs, misplaced washers, distorted brackets or an incorrectly routed part. A lever can lie against the stem while a pin has not entered its receiving feature. Confirm engagement by the approved inspection or verification action, rather than by the lever position or a clicking sound alone.
A folding-cycle finding should state when incomplete engagement, looseness or increased difficulty appeared, in the specified lubrication and adjustment condition. Extra grease or an unrecorded adjustment changes what was tested. Ask whether the proposed correction has been applied to production goods, not only the demonstration sample.
Inspect accessible gaps and contact points throughout the folding movement using the relevant method. Keep hands clear of the moving joint; a finger is not an appropriate gap probe. A design that requires adult folding should have instructions consistent with the actual sequence, but that instruction does not resolve an unintended release during use.
On a non-folding scooter, mark this row as not applicable and identify the fixed construction. Continue checking stem attachment and any handlebar-height lock. Excluding the folding test must not accidentally exclude the separate connections that keep the steering assembly secure.
Separate Brake Operation from Stopping Performance
The buyer needs to distinguish three brake results: actuation, the specified stopping or braking performance, and correct release afterward. A rear-fender brake and a hand-operated mechanism have different adjustments and contact points. An unloaded wheel stopping under hand pressure does not establish a loaded scooter's stopping performance.
Before a performance test, inspect alignment, attachment and movement. Check whether a fender reaches its intended braking surface without contacting unrelated parts. Where a hand brake is fitted, inspect lever travel, cable routing and attachment. Confirm the released condition does not leave unintended drag or interfere with steering.
Compare braking reports only with their load, initial speed, surface, wet or dry condition and actuation method identified. Changed surface conditions can alter stopping distance without proving a brake defect. Agree the controlled performance test separately if the visit can cover only static function.
Where repeated braking is required, follow the stated sequence and inspect the brake and wheel afterward. Look for loosening, deformation, cracking, abnormal wear or failure to return. Record whether the finding occurred during the sequence or only after cooling. Do not add an unsupported temperature limit or substitute an informal downhill ride for the specified method.
Plan the test area and equipment before inspection. Use controlled procedures with trained personnel; children should not serve as test riders. If only a static function check is possible at the factory, label it accordingly and obtain the separate performance assessment the plan requires.
Free Rotation Does Not Establish Wheel Retention
The retention result should cover the actual axle hardware and mounting construction before and after the required sequence. Bolts, nuts, spacers and separate retainers need to match the approved design. A three-wheel model requires coverage of both front assemblies, rather than assuming a similar appearance means identical contents.
Check wheel movement and clearance in the assembled condition. Distinguish movement of the whole axle attachment from movement within a bearing or the wheel itself. Note rubbing, abnormal sideways play, damaged threads and missing retention features. Smooth rotation is useful, but it does not establish that the wheel will remain attached under the required loading.
An assembly tightening torque, measured loosening torque and separate retention load are different results. A supplier should not substitute one for another to clear an attachment finding. Require the adopted fastening and measurement conditions and preserve displaced hardware before repair.
After the required load or durability sequence, inspect wheel retention before retightening. Look for changed clearances, axle movement, loss of engagement and damage around the mounting points. If a wheel remains attached but has developed unacceptable movement, report that condition rather than reducing the result to “wheel did not fall off.”
Check What Changes During and After Deck Loading
A deck-load result is relevant only with its support arrangement, load position and contact area, duration and criterion identified. The deck is the rider's standing platform. Check whether the assessment used the assembled scooter or its prescribed fixture and whether the handlebar and folding-joint configuration match the intended method.
Measure deflection, the movement under load, separately from any permanent deformation after unloading. Observe the deck, welds or molded joints, underside ribs and connections to the steering and rear-wheel assemblies. A platform can return close to its original position while a joint cracks or a brake begins to rub.
Recheck the functions affected by the loading: wheel clearance, steering movement, lock engagement and brake release. The sequence matters because a sound initial function check does not describe the condition after structural loading. Where the standard requires impact or repeated-load testing, a single static load is not an equivalent substitute.
Inspect newly exposed edges as well as visible cracks. U.S. 16 CFR 1500.49 specifies a sharp metal or glass edge assessment for toys and other articles intended for children under 8 years of age, including edges exposed through reasonably foreseeable damage or abuse. That defined test differs from an informal hand-feel check and does not cover every type of edge or material.
A claimed rider mass is not an instruction to use an adult as the factory test load. Structural testing needs its prescribed apparatus and controlled procedure; children must not serve as inspection riders. Identify altered specimens and preserve damaged connections for investigation.
Labels and Instructions: Match the Tested Scooter
Compare the age guidance, maximum rider mass, model identity, assembly sequence and warnings across the scooter, instructions and retail packaging. Confirm that the illustrated folding lock and brake match the supplied version. A clear manual for a different mechanism can still lead to incorrect assembly.
For U.S. children's products, 15 U.S.C. 2063(a)(5)(A) requires permanent distinguishing marks on the product and packaging, to the extent practicable. The information must enable identification of production location and date and batch or other cohort information, along with the responsible manufacturer or private labeler as specified. Check that the marks are legible and can be connected to the production records; a retail model name alone does not identify the manufacturing batch.
Review the actual warnings and instruction language against the destination requirements and approved artwork. Check whether height-adjustment limits and locking steps are visible and understandable on the supplied product. Keep product identification markings distinguishable from a claim of certification; a printed standard number does not establish that the listed tests were performed.
Match reports to the model, construction, user group and tested version. A change to an axle, folding pin, brake or deck reinforcement can affect the relevance of an earlier assessment. Ask the responsible technical reviewer what further evidence the change requires rather than assuming that a shared trade name makes the report transferable.
Hypothetical Example: Alignment Changes After the Connection Test
Suppose a two-wheel scooter initially has its handlebar square to the front wheel. The folding lock engages and the wheels rotate freely. During the specified steering-connection test, the fork is restrained in the required fixture. Afterward, the handlebar has moved relative to that fork, although the scooter still appears straight when someone casually turns both parts together.
In this hypothetical example, the before-and-after reference exposes relative slip at the connection. Keep the failed setting and photographs, then ask the supplier to investigate the affected attachment. After the correction, repeat the relevant connection test and any affected functions using the required samples and sequence. Merely rotating the bar back into line would conceal the symptom without verifying the correction.
Turn the Matrix into a Clear Inspection Brief
- Provide the correct version: drawings, approved sample, assembly instructions, artwork and relevant reports should describe the scooter being ordered.
- Define the methods: specify equipment, settings, loads, cycles, sample allocation and acceptance criteria before the visit.
- Match action to the finding: preserve slipped, cracked or released parts; verify the corrected construction with the relevant tests, rather than accepting cosmetic adjustment alone.
TradeAider's inspection standard explains sampling and customer-specific checks. Use it to agree which scooter checks belong in the visit and how safety-related findings will be reported.
For pre-shipment inspection, the order quantity is 100% complete and at least 80% packed for export. Supply the completed test matrix with the product documents so the inspector can compare finished goods with the approved version.
Contact TradeAider to agree the inspection scope, available test conditions and required reporting. Request results tied to identifiable samples and test stages, with specialist or laboratory assessments arranged separately when the method requires them.
Frequently Asked Questions
Can one report cover every handlebar-height setting?
Only if its scope and methods support that coverage. Identify the adjustment range, locking positions and configurations actually assessed. The longest exposed stem or another specified setting may need separate consideration under the applicable method. A report for one assembled height should not be extended automatically to all positions or to a revised adjustment mechanism.
Is a non-folding scooter exempt from lock checks?
The folding-lock test is not applicable when the scooter has no folding joint, but other locking functions can remain. Check any height adjustment, removable handlebar or assembly connection that relies on a lock or retainer. Record the absent feature clearly so a legitimate exclusion is not mistaken for an omitted test.
Does a higher printed rider limit prove a stronger deck?
No. The printed limit is a product claim that needs support from the appropriate assessment. Verify that the report covers the actual construction and claimed user group. A changed label cannot increase the demonstrated capacity of an unchanged scooter, and a successful informal load demonstration does not replace the prescribed test sequence.
Can the supplier repair failed samples during the inspection?
A repair can be examined separately, but preserve the original failure first. Record the adjustment or replacement, identify the repaired sample and follow the agreed retest procedure. Its result describes that condition. The buyer still needs evidence that the production units received the relevant correction and that the required reassessment covers the corrected version.
Related Articles
Grow your business with TradeAider Service
Click the button below to directly enter the TradeAider Service System. The simple steps from booking and payment to receiving reports are easy to operate.