- About Us

- Our Services
- Your Industry
- Resources
- News & Blog
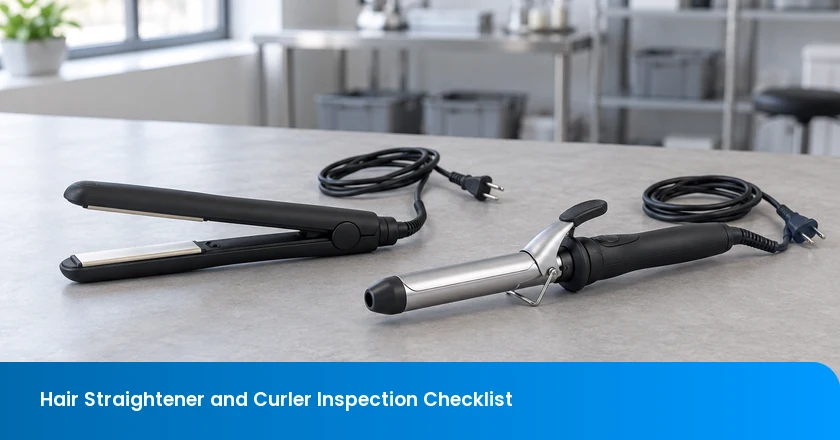
A hair straightener and curler inspection should establish four separate results: actual temperature behavior, automatic shut-off operation, cord and swivel condition, and the integrity of surfaces and assemblies. A glowing display does not prove the plate temperature, and a hot tool after a timed wait does not automatically prove a shut-off failure. Use the exact model’s approved methods, record what happened during each test, and distinguish a failed requirement from a test that was never validly completed.
Four Results to Keep Separate
- Measured heating-surface performance against the approved settings and limits.
- Shut-off behavior after the specified trigger and uninterrupted interval.
- Cord, strain-relief and swivel condition, with required durability evidence identified.
- Surface quality and secure attachment of plates, barrels, handles and supports.
Start with the Exact Model and Test Requirements
Start by identifying what is actually being shipped: a flat-plate straightener, a clamped curling iron, a curling wand or another design. Similar-looking handles can contain different heaters, controls and protective systems. Record the model, voltage version and construction revision, then match them to the purchase specification, instructions and relevant test reports. A report for a related product is not automatically evidence for the supplied version.
IEC 60335-2-23:2026 covers the safety of household and similar hair-care appliances and explicitly includes hair straighteners and curling irons. Published in February 2026, it also identifies changes concerning accessible surface temperatures and hot-surface marking. Its public summary establishes scope, not the complete test setup or numerical acceptance criteria. Confirm the applicable edition and national adoption for the destination with the responsible technical or compliance owner.
Keep the heating surface and the parts a user holds separate in the test plan. A plate or barrel intentionally heats hair; a handle, control area or support has a different role. One temperature reading cannot stand for all of them. The approved method must identify the location, operating condition and criterion for each measurement.
Prepare the Inspection Brief and Reference Samples
Send the inspector a controlled reference set before the visit: model identification, approved sample, heating-surface specification, temperature measurement method, shut-off instructions, cord construction and appearance criteria. Include any agreed tolerances and the procedure for results near a limit. This gives the factory and buyer a common basis for interpreting the same observation.
When selecting an inspection provider, confirm the equipment, time and methods available for these hair tools. The agreed scope establishes which product checks can actually be carried out during the visit; list tests requiring a laboratory or other specialist arrangement separately. For the provider background relevant to that selection, review TradeAider’s company background.
Reference samples should carry an approval status and revision. A showroom sample with no link to the order is a useful visual aid but a weak acceptance reference. If the factory has changed the coating, heater, swivel or control software, ask the technical owner which comparisons and supporting reports need renewal. Capture the change before results are recorded against an obsolete specification.
Hair Tool Inspection Checklist: Four Separate Results
Use the following checklist to keep different kinds of evidence visible in the report. Each result should identify the selected unit and the criterion used. A photograph can show a cracked housing, but a timed function needs a time record, and a temperature claim needs a measurement record. Avoid collapsing these into a single “function OK” entry.
| Inspection area | Check against | Record | Escalate when |
|---|---|---|---|
| Temperature control | Specified settings, locations and method | Setting, actual readings, timing and instrument | Readings fail limits or the method is unsuitable |
| Auto shut-off | Defined trigger, interval and resulting state | Start/reset events and observed heating state | A valid test fails or remains incomplete |
| Cord and swivel | Approved construction and flex procedure | Condition, movement and required test evidence | Damage, exposure, binding or electrical concern appears |
| Surfaces and assembly | Approved finish and attachment criteria | Location, extent, retention and reference comparison | Damage affects function, attachment or protection |
Make the result categories explicit. “Passed” means the agreed criterion was checked and met. “Failed” identifies an observed nonconformity under valid conditions. “Not tested” or “test invalid” identifies missing evidence and the reason. These distinctions prevent a missing fixture, interrupted timer or unsuitable thermometer from becoming either an invented failure or an unsupported approval.
For each finding, keep an overall view that locates the feature and a closer image that shows the detail. Temperature records should identify which plate or barrel position was measured. Timer records should show relevant handling and control events. Retain enough context for the technical owner to reproduce the check without reconstructing it from disconnected images.
TradeAider’s inspection-standard guidance can help structure the agreed criteria and defect reporting. Add the product-specific methods and limits to that framework. The purpose is a report that separates workmanship observations from functional verification and unresolved safety evidence, so the buyer can assign the appropriate follow-up.
Temperature Control: Measure the Surface, Not Just the Display
Measure actual heating-surface temperature using a method suitable for the tool, rather than treating its display as the measurement. For an adjustable model, cover the settings required by the approved plan; for a fixed-temperature model, verify its specified operating condition. Record warm-up behavior and stabilized readings separately if both form part of the purchase requirements.
Fluke’s explanation of emissivity and infrared measurement shows why a reflective surface can mislead an infrared instrument. Emissivity describes how effectively a surface emits infrared energy; the instrument uses that behavior when estimating temperature. Shiny metal can produce a substantially different indication from a more emissive surface at a comparable actual temperature. The principle matters for method selection, but it does not establish the correct setting for every plate coating.
Use the specified sensor arrangement, measurement locations and stabilization conditions. A contact probe also needs appropriate contact, positioning and suitability for the surface temperature. Do not assume that merely changing from infrared to contact measurement eliminates every source of error. Record instrument identification and calibration status so a disputed reading can be investigated.
For a straightener, distinguish the two plates and the required positions along each plate. For a curler, identify the relevant barrel positions rather than recording an unnamed spot. Follow the prescribed arrangement for open or closed plates, support position and any specified load. Those conditions affect what result is being compared with the approved reference.
Do not add ordinary tape, paint or another surface treatment to a hot styling tool simply to improve an infrared reading. Any preparation must be suitable for the temperature and permitted by the approved method. If the available equipment cannot execute that method, report the limitation and arrange the appropriate measurement. Replacing an uncertain value with a guessed tolerance makes the report less useful.
If a result is close to an acceptance boundary, apply the agreed decision rule, including measurement uncertainty where relevant. Keep the original readings. Repeating the test until one favorable number appears does not explain variation, overshoot or a potentially inconsistent control system.
Auto Shut-Off: Verify the Trigger, Delay and Heating State
Verify automatic shut-off against the exact trigger, delay and resulting operating state described for the model. “After power-on,” “after the last button press” and “after non-use” describe different conditions. Ask what resets the timer and how the shut-off state is safely confirmed before starting the test. Otherwise, an inspector may time the wrong interval.
For example, Remington’s Copper Radiance straightener lists automatic safety shut-off after 60 minutes. That is a named model’s feature, not a universal requirement for straighteners or curlers. Its listing does not establish the timer logic of another product. Use the supplied model’s controlled instructions and technical specification to define the trigger and test conditions.
Plan the sequence so label photography, surface measurements and control checks do not unintentionally interrupt a non-use interval. Record the start time and any event that could reset it. If the approved logic is unclear, resolve the ambiguity before interpreting the result; do not choose the definition that makes the sample pass.
A changed light or display is evidence of an indicator response. Confirm the specified heating state through the authorized procedure as well. Conversely, a tool can retain heat after its heater stops operating, so warmth alone does not establish continued heating. Do not touch the plate to judge this or leave the test unattended. Keep the product on the specified safe support and stop on an unsafe condition.
Pre-shipment inspection (PSI) is scheduled when the order quantity is 100% complete and at least 80% packed for export. When arranging TradeAider’s pre-shipment inspection service, state the required timer duration and observation conditions so the provider can confirm feasible coverage. Temperature checks, construction checks and packaging observations may share a visit, but the available time must still accommodate any required uninterrupted interval.
Cord Flex and Swivel Checks: Preserve the Approved Test Conditions
Inspect the cord, plug, entry point, strain relief and swivel as an assembly. Look for cuts, pinching, exposed conductors, loose parts, unsuitable routing and inconsistency with the approved construction. Strain relief is the feature intended to keep pulls and movement at the cord entry from being transferred directly to internal connections; its appearance alone does not prove the specified mechanical performance.
The CPSC’s February 2007 Conair curling-iron recall concerned a handle that could come apart and expose its line cord, creating a shock or electrocution hazard. The reported mechanism was handle separation. It illustrates why housing integrity and cord protection belong together in the inspection; it does not prove that all swivel problems have the same cause.
Check permitted swivel movement and cord clearance according to the approved procedure. Binding, abnormal looseness or interference at the entry should be recorded with the unit identifier and position. Do not pull hard, twist repeatedly or improvise powered manipulation to search for a fault. An exposed or damaged electrical assembly should be taken out of operation and escalated.
A brief movement check can reveal an immediate problem, but it is not a cord-flex endurance test. Where flex testing is required, obtain the applicable method, fixture, movement, load, cycle count and electrical monitoring requirements. The competent test owner should define the setup and determine whether it can be performed during factory inspection or needs a separate facility. No universal cycle count is supplied by this checklist.
If a cord-entry or housing correction is proposed, ask what changed and which protective functions need re-verification. Replacing a cosmetic sleeve does not necessarily correct an internal attachment issue. Keep the affected sample and its findings identifiable until the cause, correction and required follow-up tests have been resolved.
Surface Defects: Separate Appearance from Retention and Burn Risk
Judge a surface finding by its location and consequence as well as its appearance. Compare color, coating, scratches, burrs, plate edges and barrel finish with the approved criteria. A small mark on an outer housing and a defect at a hair-contact edge can require different decisions. Record the actual location and extent rather than labeling every visible blemish a minor defect.
The CPSC’s Bio Ionic curling-iron recall dated October 23, 2025 identified a barrel that could snap and detach, posing a burn hazard. It applied to specified products and date codes, not all curling irons. The example shows why secure attachment of a heated component must be assessed separately from whether its finish looks acceptable.
Check plate seating, hinge movement, clamp alignment, handle joints and the supplied stand or support as applicable. Inspect for interference, unexpected play and damage after the agreed functional sequence, once safe to handle. If an approved glide or snagging check uses a test medium, follow that method; do not use a person’s hair as an improvised test fixture.
Coating appearance also has limits as evidence. A uniform-looking surface does not by itself establish coating composition, thickness or durability. If those properties are contractual, request the appropriate material or test evidence. Conversely, reject or sort an appearance defect against the agreed reference rather than inventing a material failure from a photograph.
For workmanship sampling, the acceptance quality limit (AQL) and inspection level should be agreed with the buyer. TradeAider’s AQL calculator supports that sampling calculation. It does not decide whether an unresolved burn or electrical hazard is acceptable, and a workmanship sample result cannot substitute for a required product-safety assessment.
Resolve Invalid Tests Before Deciding Shipment Status
A questionable result needs two decisions: whether the test was valid, and what the product evidence then supports. If the equipment, setup or timing was unsuitable, preserve the observation and explain the limitation. Correcting the test can resolve the uncertainty without assuming that the product itself needs rework. Acceptance stays pending until the required evidence is available.
Illustrative Example: A Timer Test Restarted by Handling
Consider an illustrative straightener whose approved specification requires shut-off after 30 minutes of uninterrupted non-use and explicitly resets that timer when the tool moves. This is a hypothetical model condition, not a test result for any named product above. This example follows 1 selected sample from completed goods, placed safely for the test; no lot defect rate is inferred from it.
In this illustrative test, the observer starts at minute 0, moves the sample at minute 20 to photograph its rating label, and checks it again at minute 30. The sample is still heating. Because the approved trigger resets on movement, only 10 uninterrupted minutes have elapsed since the reset. The recorded observation does not yet establish failure of the 30-minute requirement.
The calculation is 30 − 20 = 10 minutes of uninterrupted non-use, not 30 minutes. Mark the initial test invalid and keep shut-off acceptance pending. Neither the apparent delay nor the explanation for it is a reason to mark the product passed.
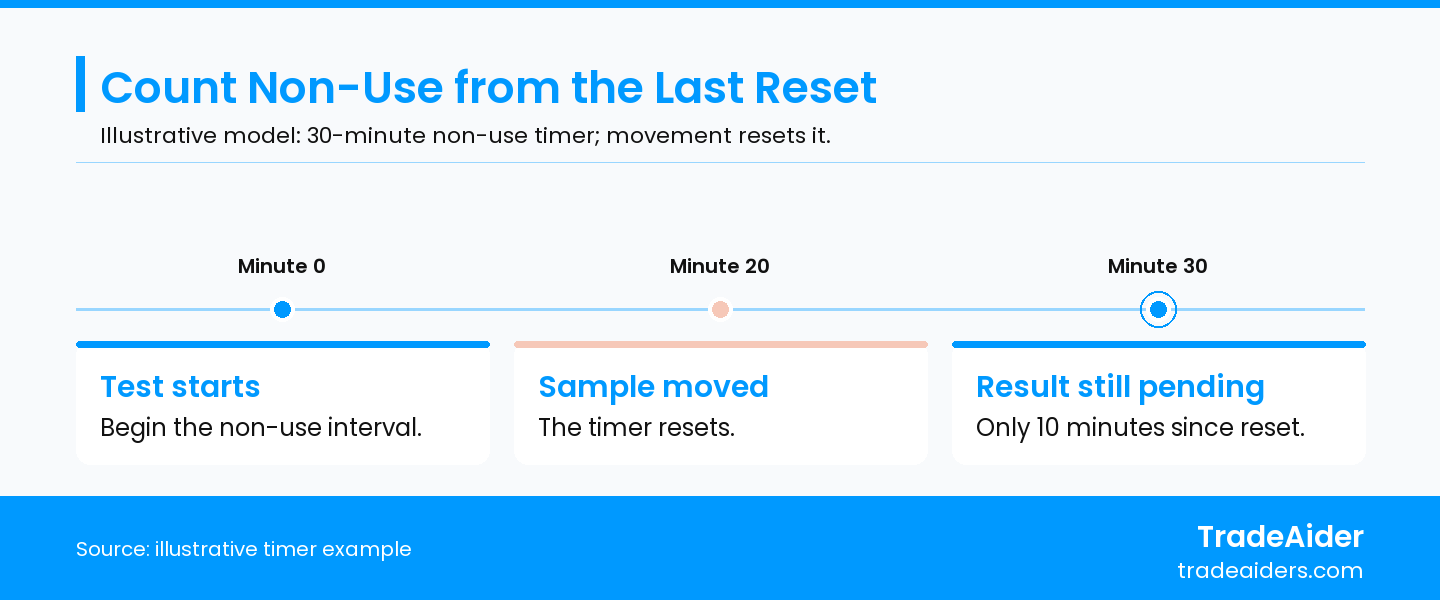
Illustrative model with a 30-minute non-use requirement and a movement reset. The first observation is not a valid completed shut-off test. Milestone spacing is schematic, not a time scale.
Correct the test setup first: complete the photographs outside the timed interval, restore the prescribed starting state and observe the full interval without a reset event. Then verify the specified heating state safely. If the sample still fails under valid conditions, hold the finding open for the technical owner to investigate, correct the product where necessary and arrange re-verification. The repeat test establishes evidence; the buyer still applies the agreed shipment disposition requirements.
Request an Inspection with Clear Tests and Open Issues
A useful inspection request identifies the model and destination, the four checks to perform, and any evidence that is still missing. Send the approved sample references, temperature method and limits, timer trigger and delay, cord construction, finish criteria, order quantity and packing status. Include recent component or software changes and previous findings so the scope addresses the actual shipment.
Ask the provider to confirm which checks can be completed on site, what equipment and time they require, and which tests need a separate arrangement. The report should connect observations, measurements and photographs to the selected units and agreed criteria, with uncompleted items clearly identified. Submit those references for scope confirmation before the visit: Contact TradeAider to plan your hair tool inspection.
Frequently Asked Questions
Should every voltage version be covered?
Yes, match the inspection plan and supporting reports to each supplied voltage variant. Similar housings do not prove equivalent internal construction or performance. For a product sold as supporting multiple voltages, confirm the required supply conditions with the technical owner; testing at one supply condition does not document every claimed operating condition.
Does this checklist cover steam straighteners?
Only its shared checks; steam models need their additional system requirements identified. Ask the technical owner to define the water-system, leakage and other applicable verification alongside the heating and electrical checks. Do not apply a dry-only operating setup to a steam appliance or assume a report for the dry version covers the steam version.
Can a warranty replace inspection evidence?
No. A warranty describes a commercial remedy or promise, not the measured condition of the shipment. Retain the inspection criteria, sample results and unresolved findings even when replacement terms are generous. The buyer still needs to decide whether the supplied goods meet the order requirements before accepting them.
Can units used for destructive testing be shipped?
Only if their approved disposition permits it. Identify and segregate units that have been opened, damaged, modified or otherwise made unsuitable for sale during testing. Record whether each tested unit is returned, retained or disposed of, and reconcile those units with the shipment count rather than silently putting them back into cartons.
Related Articles
Grow your business with TradeAider Service
Click the button below to directly enter the TradeAider Service System. The simple steps from booking and payment to receiving reports are easy to operate.