- About Us

- Our Services
- Your Industry
- Resources
- News & Blog
Inflated brightness claims are one of the most persistent quality problems in the consumer projector market. A listing may advertise "3,000 ANSI lumens," but the figure on the box reflects raw light source output — not the actual brightness delivered to a screen using the standardized nine-point measurement method. Buyers who do not include lumen calibration verification in their pre-shipment inspection checklist routinely receive products that deliver less than half the advertised brightness under real viewing conditions. Optical focus sharpness is the second major failure point: poor lens alignment, optical block tolerances at the edge of specification, and inadequate factory focus calibration all produce images that look acceptable in the center but become noticeably soft or blurred toward the corners. This article explains how to verify both — ANSI lumen accuracy and optical focus sharpness — at the factory, before a single unit leaves the door.
Key Takeaways
- ANSI lumens are measured using a standardized nine-point illuminance method defined in IEC 61947-1, which superseded the original ANSI IT7.228-1997 standard; a projector with genuine 1,000 ANSI lumens is roughly equivalent to 7,000 raw light-source lumens, and buyers should demand test reports, not just box specs.
- Optical focus sharpness should be validated using standardized test patterns — grid overlays, USAF 1951 resolution targets, and slanted-edge charts — with measurements taken at the center, mid-field, and corner zones of the projected image.
- Factory lumen calibration drift is a batch-level risk: light sources may be within spec on the golden sample but vary by as much as 20–30% across a production run without optical path adjustment between units.
The ANSI Lumens Problem: Why Spec Sheet Numbers Cannot Be Trusted Without Verification
What ANSI Lumens Actually Measure
The ANSI lumen standard was developed to solve exactly the problem that now plagues the consumer projector market: inconsistent, inflated, or meaningless brightness figures. Projector Reviews explains that before ANSI adopted its measurement standard, many manufacturers simply quoted peak lumen levels — the single highest brightness point the light source could achieve for a fraction of a second — rather than a realistic projected image brightness. The ANSI standard replaced peak measurement with a nine-point averaged measurement of the projected image on a screen.
The method, as described in detail by ProjectorCentral's lumens explainer, works as follows: the projected image is divided into a 3×3 grid, and an illuminance meter (measuring in lux) is held flat against the screen at each of the nine intersection points, sensor facing the projector. The average of all nine readings is multiplied by the projected image area in square meters to produce the ANSI lumen figure. Critically, the room must be dark with no reflective surfaces, and the meter must be positioned correctly — any ambient light contamination inflates the reading. The resulting measurement reflects actual brightness delivered to the screen, not theoretical light source output.
The Difference Between ANSI Lumens and "Lumens" on Chinese Projector Boxes
Consumer projectors from Chinese factories — particularly in the sub-US$200 segment — routinely list brightness figures that are raw light source or LED lumen values rather than ANSI-calibrated projector output figures. Yaber's buying guide confirms that regular lumens figures may represent only 30–50% of the nominal value in actual projected brightness, because they do not account for optical path losses — lens transmission, LCD or DMD panel efficiency, and color filter absorption. A projector listed at "8,000 lumens" by a Chinese factory may genuinely deliver only 800–1,200 ANSI lumens to a screen under proper testing conditions.
For buyers, this creates a direct customer satisfaction and return rate problem. A customer who buys a "1,500 ANSI lumen" projector for a moderately lit living room and receives a device that actually delivers 600 ANSI lumens will experience a washed-out, dim image in any ambient light condition and will return the product. The fix is not a product redesign — it is adding lumen calibration verification to the pre-shipment inspection protocol.
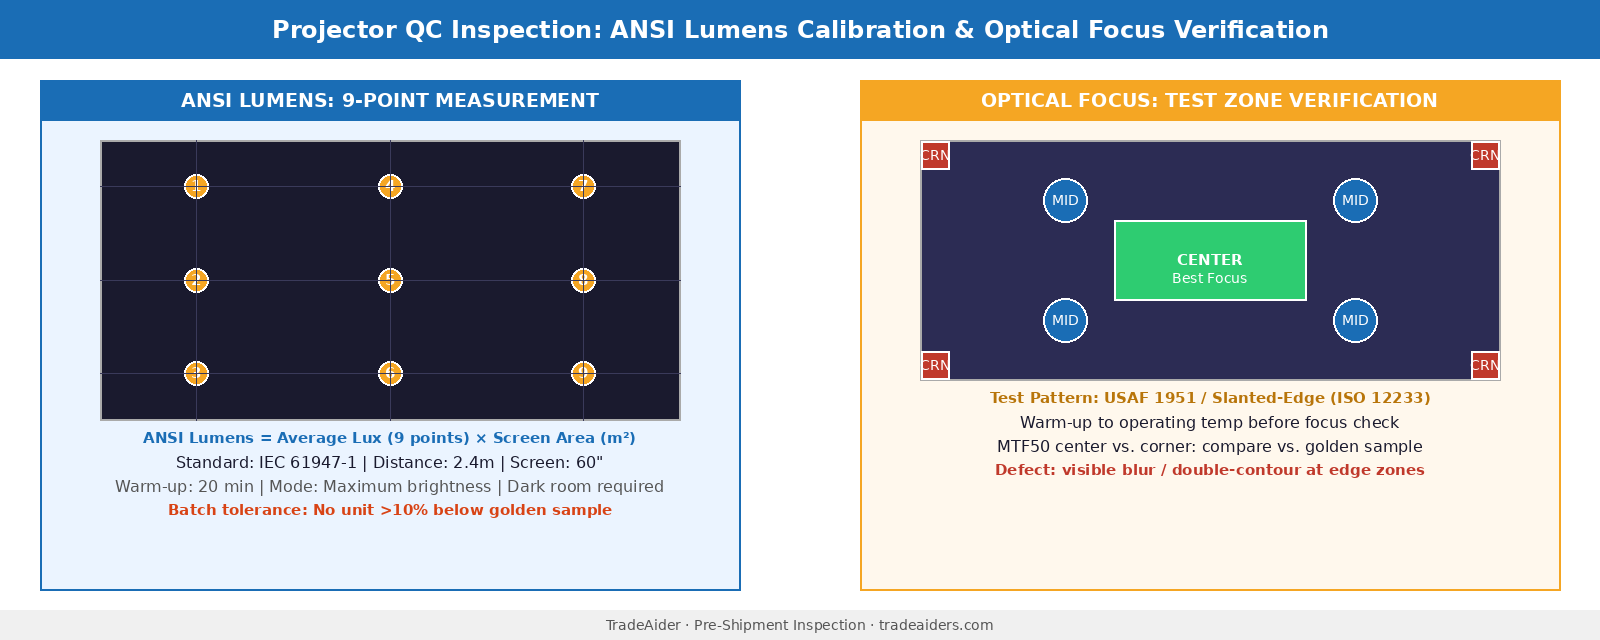
Left: ANSI nine-point lux measurement grid for lumen verification. Right: Optical focus test zones — center, mid-field, and corner.
IEC 61947-1: The Current Standard for Projector Measurement
Buyers specifying test standards in their product checklist should reference IEC 61947-1 rather than the original ANSI designation. As noted by Display Daily, the ANSI IT7.228-1997 standard was retired in 2003 and superseded by IEC 61947-1:2002, which specifies the same nine-point measurement methodology for fixed-resolution projectors. An "IEC lumen" and an "ANSI lumen" are functionally equivalent — both use the same nine-point averaged lux methodology. Buyers should request the IEC 61947-1 test report from their factory, not simply a brightness figure on a spec sheet.
One additional complexity worth knowing: Display Daily's analysis highlights that DLP projectors with white color wheel segments can achieve high ANSI lumen numbers by boosting white output while delivering much lower Color Light Output (CLO) — the combined lumen total measured per color channel. For buyers sourcing consumer-grade DLP projectors, requesting both the white ANSI lumen figure and the CLO figure gives a more complete picture of how the projector will perform during typical video and presentation content, not just white-screen brightness tests.
Conducting Lumen Verification During Pre-Shipment Inspection
Equipment and Environment Setup
Accurate ANSI lumen measurement requires a calibrated illuminance meter (lux meter), a neutral matte projection screen of known dimensions, a fully dark test room, and the projector set to its brightest factory-default mode. The standard test configuration uses a projection distance of 2.4 meters and a 60-inch screen size. At this distance and size, the nine measurement points are precisely defined by the 3×3 grid. The projector should be warmed up for at least 20 minutes before measurement — light sources, particularly laser and LED-laser hybrid systems, stabilize in output after a warm-up period and cold-start measurements will read high.
For factory-level batch inspection, the protocol can be simplified to a comparative approach: measure the golden-sample unit against the approved specification, then measure a representative AQL sample from the production batch. Any unit that reads more than 10% below the golden sample is flagged for further investigation. This comparative approach catches batch-level calibration drift without requiring the full laboratory setup needed for absolute ANSI lumen measurement.
Common Causes of Lumen Deficiency in Production Batches
The most common factory-floor causes of lumen deficiency include: light source binning inconsistency (LED or laser diode chips within the same shipment vary in output), optical path contamination during assembly (dust on the lens or DMD panel degrades transmission), incorrect factory brightness mode settings (units shipped in Eco or Standard mode rather than Bright mode), and power supply variance affecting light source drive current. A pre-shipment inspection that includes powered-on lumen comparison against the golden sample, combined with a visual check of the lens cleanliness and OSD factory mode settings, will identify all of these failure modes.
| Lumen Defect Category | Typical Cause | Detection Method | Severity |
|---|---|---|---|
| Output >10% below spec | Light source binning variance | Lux meter vs. golden sample | Major |
| Non-uniform brightness across 9 zones | Optical alignment drift | Nine-point lux variance >15% | Major |
| Brightness below Eco mode output | Wrong factory brightness setting | OSD menu check | Critical |
| Dim center, brighter corners | Lens contamination or scratch | Lens visual inspection + lux map | Major |
Optical Focus Sharpness: Why the Center Isn't Enough
How Projector Focus Calibration Works and Where It Fails
Consumer projectors use a fixed-lens optical system with a manual or motorized focus ring that adjusts the distance between the lens elements and the imaging chip (LCD panel or DMD). Factory calibration sets this focus position for the standard throw distance. The problem for QC inspectors is that focus is not uniformly sharp across the entire projected image — it is always sharpest at the center and progressively softer toward the edges and corners due to optical field curvature. An acceptable product has a sharpness profile where edge softness falls within tolerances specified in the product checklist. An out-of-specification product shows obvious blurring or double-contour artifacts at normal viewing distances from edge zones.
Thermal expansion compounds this problem. Proper projector calibration requires the unit to reach operating temperature before focus is finalized — heat causes expansion in the optical block and lens housing that can shift the focus plane by a measurable amount from cold-start settings. Factory workers who calibrate focus on a cold projector and then pack it immediately may be shipping units that are subtly out of focus at normal operating temperature.
Test Patterns for Factory-Level Focus Verification
The standard approach to projector focus verification uses standardized test patterns projected from a reference source onto the screen. Edmund Optics' guide to resolution testing identifies the USAF 1951 target as a common test tool for reverse projection testing: it consists of groups of horizontal and vertical bar pairs of increasing spatial frequency, dispersed across the full field. The finest bar pairs the projector can render with distinguishable contrast define its resolution limit at each field zone.
For a practical factory inspection protocol, three test pattern types provide the most useful data. A full-field grid pattern reveals geometric distortion and keystone issues at the same time as focus. A fine-line resolution chart (similar to USAF 1951) placed in the center, mid-field, and corner zones identifies where focus degrades below the acceptable threshold. A slanted-edge pattern, analyzed per ISO 12233, enables quantitative MTF (Modulation Transfer Function) measurement — the industry standard method for expressing image sharpness as contrast versus spatial frequency.
Understanding MTF for Non-Technical Buyers
MTF doesn't need to be intimidating to be useful in a QC checklist. FISBA's MTF testing guide describes it simply: MTF measures how well a lens transfers contrast from the object to the image at different levels of detail. An MTF of 1.0 means perfect contrast transfer — the lens reproduces a black line on white background with full contrast. As spatial frequency increases (finer details), MTF drops. The point where MTF drops to 0.5 (50% contrast) — called MTF50 — is a practical measure of perceived sharpness. For factory QC purposes, buyers do not need to run full MTF curves: they need a comparative visual check using the same test pattern and observation distance as the golden sample, classifying any unit that shows perceptibly more edge blurring or corner softening relative to the reference as a defect.
TradeAider's inspection service for electronics and consumer goods includes on-site functional verification against buyer-specified golden samples. For projector orders, buyers can specify both lumen output tolerance (e.g., "no more than 10% below golden sample reading") and focus sharpness criteria (e.g., "corner sharpness must be visually acceptable at the agreed test distance using the specified test pattern") in the product checklist before the inspection date. See how TradeAider's pre-shipment inspection works →
Building a Complete Projector Pre-Shipment Checklist
Functional Tests to Include
Beyond lumen output and focus sharpness, a complete projector inspection checklist should cover display connectivity (HDMI, USB, wireless screen mirroring), resolution mode settings, keystone correction range and accuracy, fan noise at operating temperature, remote control functionality, and boot time. Color accuracy verification — checking that factory color calibration matches the approved reference — is particularly important for projectors marketed for photo or cinematic use, where a green or blue color cast is a significant quality defect. The importance of testing multiple color modes (not just the brightest mode) applies here: a projector with superb brightness in "Presentation" mode may have an unacceptable green cast in "Movie" mode that buyers need to catch before shipment.
Packaging and Label Verification for E-Commerce
For Amazon FBA sellers sourcing projectors from China, packaging compliance is a separate but critical inspection layer. ANSI lumen figures printed on retail packaging must match the test report — mismatched or inflated claims on packaging can trigger Amazon listing quality flags. Barcode verification, FNSKU placement, carton drop test pass/fail, and inner packing foam protection must all be verified. As an official Amazon SPN partner, TradeAider specifically checks FBA packaging requirements during electronics inspections. See TradeAider's Amazon FBA inspection solutions →
Frequently Asked Questions
What is the difference between ANSI lumens and the lumens listed on most Chinese projector boxes?
ANSI lumens measure actual projected image brightness using a standardized nine-point illuminance method defined in IEC 61947-1, while the lumens figure typically listed on consumer projector boxes from Chinese factories reflects raw light source output — before accounting for optical path losses through the lens, DMD or LCD panel, and color filters. The practical difference is substantial: a projector claiming "8,000 lumens" may genuinely deliver only 800–1,200 ANSI lumens to a screen, because the two measurement methods are entirely different. Buyers should insist on IEC 61947-1 test reports, not raw lumen figures, when evaluating brightness claims from suppliers.
How is optical focus sharpness verified during factory inspection?
Factory-level focus sharpness verification uses standardized test patterns projected at the standard throw distance, with the projector warmed up to operating temperature. Inspectors evaluate sharpness at the center, mid-field, and corner zones of the projected image, comparing against an approved golden sample. Fine-line resolution charts — such as USAF 1951 targets or slanted-edge patterns analyzed per ISO 12233 — provide both visual and quantitative reference points. Any unit that shows perceptible corner blurring, double-contour artifacts, or color fringing relative to the approved reference should be classified as a major defect.
Can lumen output degrade across a production batch even if the first unit passed?
Yes — and this is one of the most commonly missed risks in projector sourcing. Light source components (LEDs and laser diodes) are binned by output level, and binning consistency within a single factory order depends on the supplier's incoming inspection controls. Even within a single batch, units can vary by 15–25% in actual lumen output if light source component sorting is inadequate. Additionally, optical path contamination during assembly — dust on the lens or projection panel — progressively degrades brightness on units assembled later in the production run. An AQL-based sample of lumen readings across the batch, rather than a single golden-sample measurement, is the only reliable way to catch this type of drift.
What test equipment does an inspector need to verify projector lumens on-site?
The minimum equipment needed for a comparative lumen verification during factory inspection is a calibrated illuminance meter (lux meter), a dark test room or light-blocking enclosure, and a neutral matte screen of known dimensions. For the simplified comparative protocol — checking production units against the golden sample — the same room, screen, and projector distance must be used for all measurements to eliminate environmental variables. A more complete ANSI lumen measurement requires precise nine-point measurements and calculation against the screen area, which an experienced inspector can conduct using standard equipment without specialized laboratory infrastructure.
Related Articles


Grow your business with TradeAider Service
Click the button below to directly enter the TradeAider Service System. The simple steps from booking and payment to receiving reports are easy to operate.