- About Us

- Our Services
- Your Industry
- Resources
- News & Blog

A successful pre shipment inspection is not a last-minute ritual; it is a buyer-controlled release gate where finished product evidence and shipment-readiness evidence must both be proven before goods leave the factory. The practical answer is to inspect the risks that can still be changed, record the evidence that proves conformity, and decide whether to release, hold, sort, rework, test, or reinspect before the shipment moves beyond buyer control.
Key Takeaways
- Confirm readiness before booking: for TradeAider PSI, the order should be 100 percent completed and at least 80 percent packed for export.
- Use AQL with a real lot map: random samples should represent the finished shipment, not the easiest cartons to show.
- Check shipment evidence: product quality, labels, packing, barcode, quantity, carton condition, and documents all affect release.
- Do not overload PSI: hidden safety, chemical, or performance claims need testing or earlier-stage controls.
What Does a Successful Pre Shipment Inspection Need to Prove?
A successful pre shipment inspection must prove that the finished lot matches the buyer's requirements and is ready to ship in its current packed condition. Product quality alone is not enough if labels, cartons, counts, or documents are not release-ready.
The WTO Agreement on Preshipment Inspection treats pre-shipment inspection as a formal trade activity covering inspection in the exporting territory, objective procedures, confidentiality, delays, and reporting. For ordinary importers, the lesson is practical: PSI should be objective, prepared, documented, and tied to agreed buyer requirements.
ISO/IEC 17020:2026 also matters because it frames inspection as determining conformity with requirements through competent and consistent operation. A successful PSI therefore depends on what the buyer gives the inspector before the visit: PO, product specification, approved sample, packing file, defect rules, and any customer or market requirement that affects release.
The strongest PSI does not try to solve every quality problem at the final hour. It asks whether the finished lot, as packed for export, should be released, held, sorted, reworked, tested, or reinspected.
The 10 Buyer Controls That Make PSI Work
These 10 controls are more useful than a generic list of inspection tasks because each one closes a specific failure mode. The buyer can use them before booking the inspection and again when reviewing the report.
NIST acceptance sampling handbook explains the basic logic behind acceptance sampling: a sample is selected from a lot and the information from that sample supports a decision about disposition of the lot. That principle is exactly why PSI preparation starts before the inspector arrives. If the lot definition, defect rules, and carton spread are weak, the sample result cannot carry the release decision cleanly.
| Control | What It Prevents | Evidence to Prepare | Release Meaning |
|---|---|---|---|
| 1. Product file | Inspecting against the wrong requirement | PO, drawing, sample, tolerance | Criteria are fixed |
| 2. Lot readiness | Partial-lot inspection | Finished quantity and packing status | PSI represents shipment |
| 3. Defect severity | Subjective pass/fail arguments | Critical, major, minor definitions | Defects have consequences |
| 4. AQL plan | Uncontrolled sample choice | Lot size, level, AQL | Sample supports lot decision |
| 5. Carton spread | Best-carton bias | Carton range and locations | Sample covers shipment |
| 6. Function checks | Appearance-only release | Test method and expected result | Use risk is visible |
| 7. Label checks | Customs or customer receiving issues | Artwork, barcode, origin, warning | Market readiness is visible |
| 8. Packing checks | Transit damage or count gaps | Inner pack, master carton, marks | Goods can travel |
| 9. Photo evidence | Dispute without proof | Wide shots and close-ups | Findings are traceable |
| 10. Action rule | Report with no decision | Release, hold, sort, repair, reinspect | Buyer can act |
A failed PSI is not always a bad result. It can be the best outcome when the report prevents a weak shipment from leaving the factory. The real failure is a report that looks neat but does not give the buyer enough evidence to decide.
Calculated from 2 release gates, 2 - 1 equals 1 unresolved gate, so release should stay on hold even if the other gate looks acceptable. Calculated from 10 buyer controls and 3 severity levels, 10 x 3 equals 30 control-to-severity checks before deciding whether the shipment can move.
PSI Timing: Do Not Inspect Before the Shipment Exists
For TradeAider Pre-Shipment Inspection, the baseline readiness rule is 100 percent completed goods and at least 80 percent packed for export. This matters because PSI is supposed to verify a finished shipment. If production is still moving, labels are not applied, cartons are missing, or the packing list is not final, the buyer is asking for a prediction rather than a release check.
ISO 2859-1:2026 provides AQL-indexed sampling schemes for lot-by-lot inspection by attributes. That only works when the lot is defined. If the factory shows a moving target, the sample can become biased or obsolete before the report is even reviewed.
Before confirming the visit, the buyer should ask three readiness questions: what exact quantity is finished, what percentage is already in export packing, and which cartons or SKUs are excluded from the presented lot. If the factory cannot answer those questions, the inspection may still be useful as a progress check, but it should not be treated as a final release PSI.
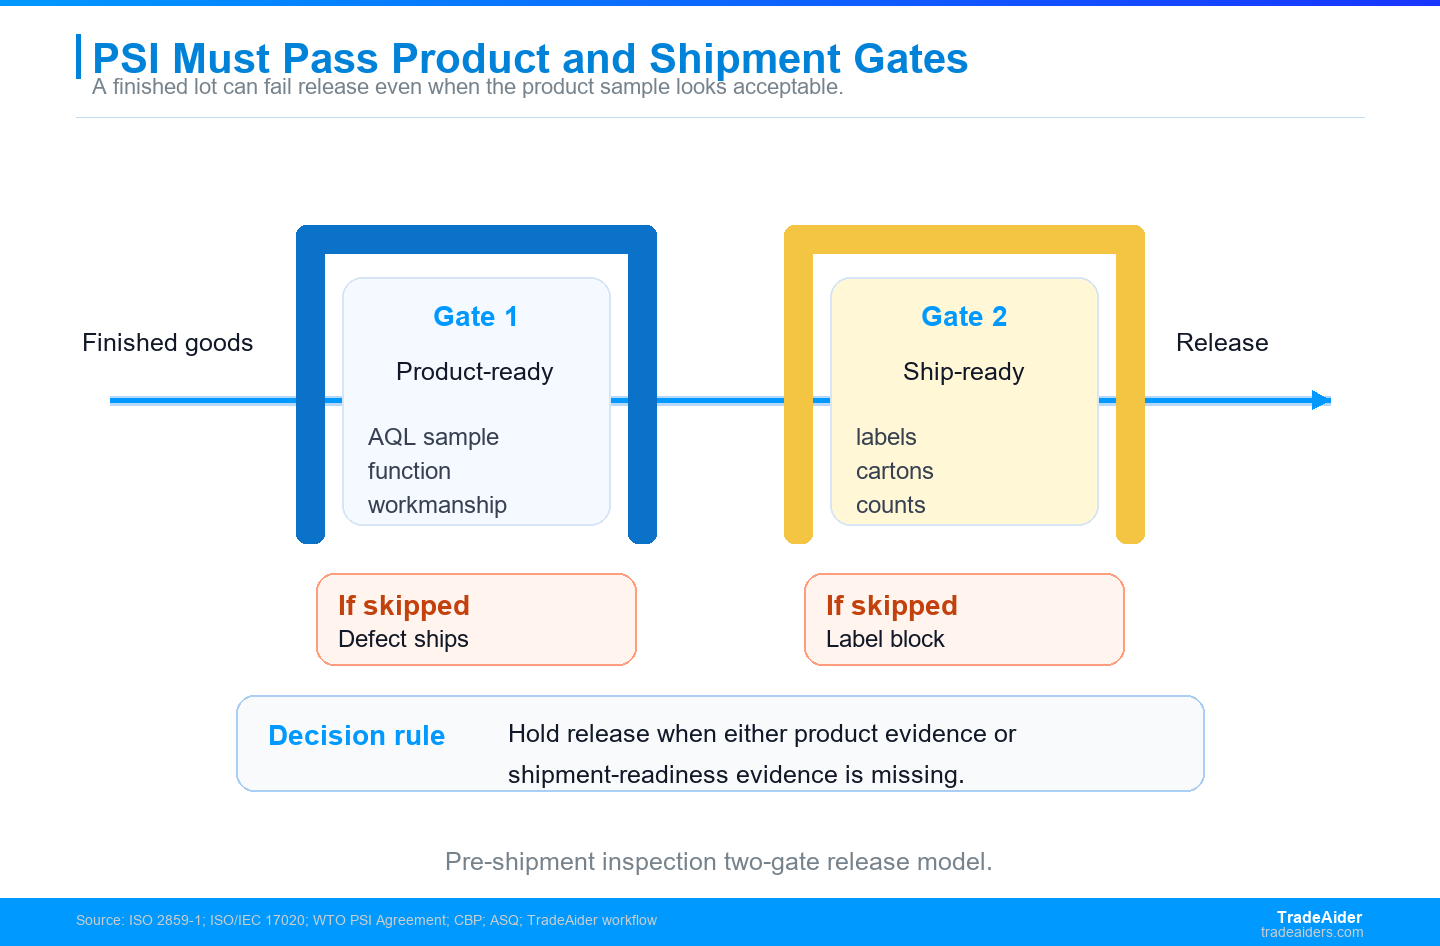
A successful pre-shipment inspection needs two gates: product evidence and shipment-readiness evidence must both be closed before release.
Finished and packed status changes the meaning of PSI
A finished product sample can pass while the shipment still fails because of wrong cartons, missing barcodes, mixed quantities, weak inner packing, or missing destination marks. PSI is strongest when it checks the product and the packed shipment together.
For TradeAider PSI, the order should be 100 percent completed and at least 80 percent packed for export. That timing gives the inspector a finished-lot view of workmanship, labels, quantities, packing, and carton condition. If the lot is not ready, the buyer is not inspecting shipment evidence yet. A buyer can still request an early visit, but the report should call it a progress check rather than a final release inspection.
Photos prove condition only when they are traceable
The report should show where sampled goods came from, what was inspected, what failed, and how defects spread across cartons or SKUs. A photo of a defect is helpful; a photo tied to sampled unit, carton range, severity, and count is decision-grade evidence.
A defect photo without item number, carton range, location, or quantity is only a picture. For a 4,800-unit shipment, ten clear photos can support a hold decision if they connect to the sampled units and defect counts. The same photos are weak if nobody can tell whether they represent one unit or a wider batch.
Sampling, AQL, and Special Tests Must Be Planned Before the Visit
ASQ explains that acceptance sampling plans define sample sizes and acceptance or non-acceptance criteria. In PSI, the buyer should decide AQL level, inspection level, defect severity, and sample pull rules before inspection day. Changing the rules after defects are found makes the report weaker.
AQL is not the whole PSI. It helps with visible, countable defects in a defined lot. It does not replace function checks, barcode scans, packing assessment, carton drop needs, document review, or category-specific testing. If the product needs chemical, safety, radio, electrical, or performance testing, that proof should be arranged before PSI or the release decision should clearly remain conditional.
NIST lot acceptance sampling plan guidance also frames the plan as a sampling scheme plus rules for making decisions. For a PSI buyer, that means the inspection booking should specify more than sample size. It should also specify what happens if the lot fails, whether the factory may repair before reinspection, whether the buyer will accept sorting, and whether the inspection report should separate a known-risk subgroup from the general random sample.
This is where many last-minute inspections lose value. The buyer books PSI, the factory presents goods, defects appear, and nobody has agreed whether the next step is correction, discount, partial shipment, full hold, or reinspection. The better approach is to write the release rule before the report comes back. Then the inspection result can trigger action instead of another negotiation.
Pre-shipment inspection should not carry hidden testing risk alone
Importers also carry compliance responsibility. CBP notes that importers and the importing/exporting community share responsibility for compliance, and CBP reasonable care guidance is a reminder that documents and product claims cannot be left to assumption. PSI can collect evidence, but hidden claims need the right proof path.
PSI can verify visible conformity and simple functions, but it cannot turn a last-minute visual check into chemical, safety, or durability proof. When the product category needs laboratory evidence, the test plan should be started before the PSI date so the release decision is not forced into guesswork.
Scenario Estimate: A Small Label Error Can Become a Shipment Problem
Assume an 18,000-unit shipment, with 4 percent affected by a wrong label or packing issue. At USD 0.41 of direct handling per affected unit, the first handling exposure is about USD 295. That does not include missed cutoff, retailer chargebacks, customer receiving delays, warehouse relabeling, or the cost of urgent buyer communication.
This is why a successful PSI must check shipment-readiness evidence, not only visible product defects. If the product passes but labels fail, the shipment is still not ready. If the cartons pass but the product fails function testing, the shipment is still not ready. Both gates have to close.
Calculated from the same PSI scenario, 18,000 units x 4 percent affected x USD 0.41 equals USD 295 of direct handling before replacement packaging, missed vessel cutoff, or buyer-side receiving work. Calculated from 100 percent completion and 80 percent packing, the inspector can see finished product, export cartons, labels, and quantities in one visit. Calculated from 125 sampled units, a defect concentrated in 3 cartons should trigger carton-range review instead of a broad pass. Calculated from a 1-day failed PSI delay, 1 x 24 hours equals 24 hours of schedule pressure in exchange for protecting launch quality.
Where TradeAider Fits Before, During, and After PSI
TradeAider can help the buyer convert requirements into a PSI checklist, draw AQL samples, check workmanship and function, review packaging and labels, document defects with photos and counts, and deliver a report that supports release or hold. When the lot is not ready, a During Production Inspection may be more useful than forcing PSI early.
When hidden risks exist, TradeAider can coordinate inspection evidence with product testing or use earlier-stage Pre-Production Inspection to prevent last-minute release pressure. Buyers can also use the AQL calculator and contact TradeAider to prepare the sample plan before booking.
A good TradeAider PSI brief should also name the shipment consequence of each defect family. A wrong barcode may block warehouse receiving even when the product itself functions. A weak carton may create freight damage even when the product is clean. A missing warning label may stop market entry even when the workmanship passes. Treating these as shipment-readiness controls prevents the buyer from approving a product that still cannot move cleanly through logistics or customer receiving.
- Send the product file and packing file before inspection day.
- Confirm finished quantity and at least 80 percent export packing for PSI.
- Define critical, major, and minor defects before sampling starts.
- Ask for carton spread, barcode scans, packaging photos, and measurement records.
- Use the report to decide release, hold, sort, repair, test, or reinspect.
Frequently Asked Questions
What makes a pre shipment inspection successful?
A pre shipment inspection is successful when it verifies a finished, representative lot against clear buyer requirements and produces enough evidence for a release decision. The report should cover product quality, function, packaging, labels, quantities, carton condition, defect severity, photos, and any action needed before shipment. It should leave the buyer with a clear release, hold, sort, repair, or reinspection path.
When should I book a pre-shipment inspection?
Book a pre-shipment inspection for a release decision when goods are fully completed and mostly packed for export. For TradeAider PSI, that means 100 percent completed and at least 80 percent packed. If production is still unstable, materials are changing, or the buyer needs process correction, a during-production inspection may be more useful than an early PSI that cannot represent the final shipment.
Does PSI guarantee that every unit is defect-free?
No, PSI does not guarantee that every unit is defect-free because it normally uses sampling to support a lot-level decision. It reduces risk and creates buyer evidence, but it does not inspect every unit unless the buyer orders full inspection. Critical products or known high-risk defects may need extra testing or targeted checks.
What documents should I send before PSI?
Send the purchase order, product specification, approved sample details, artwork, barcode and label files, packing requirements, inspection standard, defect severity rules, special test requirements, and known supplier or production risks. Add the packing list and shipment-readiness status when labels, cartons, or quantities are release-critical. The clearer the file, the less room there is for subjective dispute after inspection.

Related Articles


Grow your business with TradeAider Service
Click the button below to directly enter the TradeAider Service System. The simple steps from booking and payment to receiving reports are easy to operate.