- About Us

- Our Services
- Your Industry
- Resources
- News & Blog
Consumer VR/AR headsets have moved from novelty to mainstream — and with that growth comes a sourcing market increasingly dominated by Chinese manufacturers producing everything from budget headsets to near-flagship optics. The inspection challenge is real: a VR headset with subtly misaligned lenses, poorly calibrated distortion correction, or a face gasket that digs into the cheekbones will generate returns at a rate that erases your margin. And unlike a scratched casing, optical and ergonomic defects are almost impossible for your customer to photograph and describe in a return claim — they just say "it makes me sick" or "I can't use it for more than 20 minutes."
This guide covers the two most critical quality dimensions that importers and Amazon sellers often fail to test adequately: lens optical distortion (including chromatic aberration) and wearable comfort. Both require specific test procedures and defined pass/fail criteria that belong in your pre-shipment inspection checklist.
Key Takeaways
- Lens distortion defects — barrel/pincushion geometry errors and chromatic aberration — are the leading cause of VR-induced eye strain and are detectable with a structured visual test pattern, no lab equipment required.
- IPD adjustment range and accuracy is the single most impactful ergonomic specification: a headset with a fixed IPD or narrow adjustment range will cause discomfort for anyone outside the average 63–64mm.
- Factory QC for VR/AR headsets requires testing the assembled unit, not just individual components — optical distortion profiles change when lenses are seated in their final housing position.
Understanding Lens Optics in VR/AR Headsets
The Three Dominant Lens Architectures
The type of lens used in a headset determines which optical defects are most likely to appear, and therefore which tests should be prioritized in QC. VR headset lens types each carry inherent trade-offs between cost, weight, and optical quality:
Fresnel lenses: Thin and lightweight, made with concentric ring structures. The dominant lens type in consumer headsets for years due to low cost and compact form factor. Their concentric ring structure causes characteristic flare and glare around bright objects (called "god rays") and can produce visible ring artifacts. Chromatic aberration is more pronounced at the lens periphery than at the center. Most software distortion correction profiles are built specifically for Fresnel geometry.
Aspheric lenses: Solid lenses with a variable-curvature profile that eliminates many aberrations. Heavier than Fresnel equivalents but optically cleaner, with a larger sharp "sweet spot" and reduced ring artifacts. More expensive. An improperly manufactured aspheric lens can cause "pupil swim" — the world appears to slightly distort as the user moves their head — which is a factory-detectable defect.
Pancake lenses: The current premium standard, using polarized folded optics to achieve a very short optical path — less than 1mm lens-to-display distance versus 50mm+ for Fresnel. As TRIOPTICS pancake lens QC documentation explains, pancake lenses must be controlled for paraxial centering and tilting, center thickness, MTF across the eyebox, chromatic aberration, and ghost/haze — because unwanted reflections on the wrong surface create haze or ghost images. These are complex multi-element systems with tight assembly tolerances.
Why Optical Defects Are Magnified in Headsets vs. Other Displays
In a conventional display, a user is 50–80cm from the screen and any minor optical imperfection is small in the context of their full field of view. In a VR headset, the display is 4–6cm from the eye, and the lens system magnifies it to fill 90–120 degrees of the user's visual field. Radiant Vision Systems' near-eye display testing documentation makes this explicit: as display images are magnified to fill the user's field of view, display defects are also magnified. Issues with uniformity of brightness and color, dead pixels, line defects, cloudiness, and image position become far more evident to the user whose eyes are only centimeters away from the display screens.
This means that quality tolerance levels appropriate for a monitor or TV — AQL 2.5 for display defects — are often inadequate for VR headsets. A dead pixel that would be a Minor defect on a tablet is a Major defect in a headset because the user's eye is pointed directly at it in a magnified field.
Optical Distortion Testing: What to Measure and How
Barrel and Pincushion Distortion
Every VR lens system introduces geometric distortion into the image. LaValle's VR textbook explains the physics: Fresnel lenses in particular cause pincushion distortion — straight lines at the edge of the field appear to bow inward. To compensate, the rendering engine pre-applies the inverse distortion (barrel distortion) to the image before display, so it appears straight after passing through the lens. When the factory's software distortion calibration profile doesn't match the actual lens fitted in the housing, the compensation is wrong and the user sees residual warping.
The QC test for geometric distortion requires displaying a test pattern — a grid of evenly spaced straight lines or a checkerboard — while wearing the headset. Lines at the center of the field should appear straight. Lines at the edge of the field should have consistent, predictable curvature that does not change dynamically as the user moves their head. Dynamic warping of grid lines during head movement is a critical optical defect — the distortion correction profile is mismatched to the installed lens. Static but asymmetric distortion (one eye's grid curves more than the other, or left/right of a single lens differ) indicates a lens centering or alignment error at assembly.
Chromatic Aberration: The Most User-Reported Optical Defect
Chromatic aberration (CA) occurs when the lens system refracts different wavelengths of light (colors) by different amounts, causing color fringing at edges and double-imaging of high-contrast details. TRIOPTICS' VR optics testing methodology lists lateral chromatic aberration measurement across the field of view as a standard production QC parameter for both AR and VR headsets — alongside MTF, distortion, and brightness uniformity.
At the factory, chromatic aberration is visible without specialized equipment. Display a test pattern showing fine black text on a white background, or thin white lines on black, across the full field including the periphery. Look specifically for:
- Red/green/blue color fringing at the edges of text or lines
- Text appearing to "double" or become blurry with colored shadows as the eye moves toward the lens edge
- Asymmetric CA between left and right eye (one eye shows more fringing than the other — indicates mismatched lenses from different lot runs or incorrect lens seating)
Some CA at the extreme periphery (beyond 30–35° from center) is normal and expected in Fresnel and aspheric designs — the software calibration compensates for it. CA visible within 20° of center, or asymmetric CA between the two eyes, is a Major or Critical defect respectively. Optocraft's AR/VR optics QC analysis notes that micro-errors in optical alignment can lead to visible distortions or fatigue symptoms — the visual stress of the brain trying to reconcile mismatched optical information from the two eyes is the primary cause of VR-induced headaches.
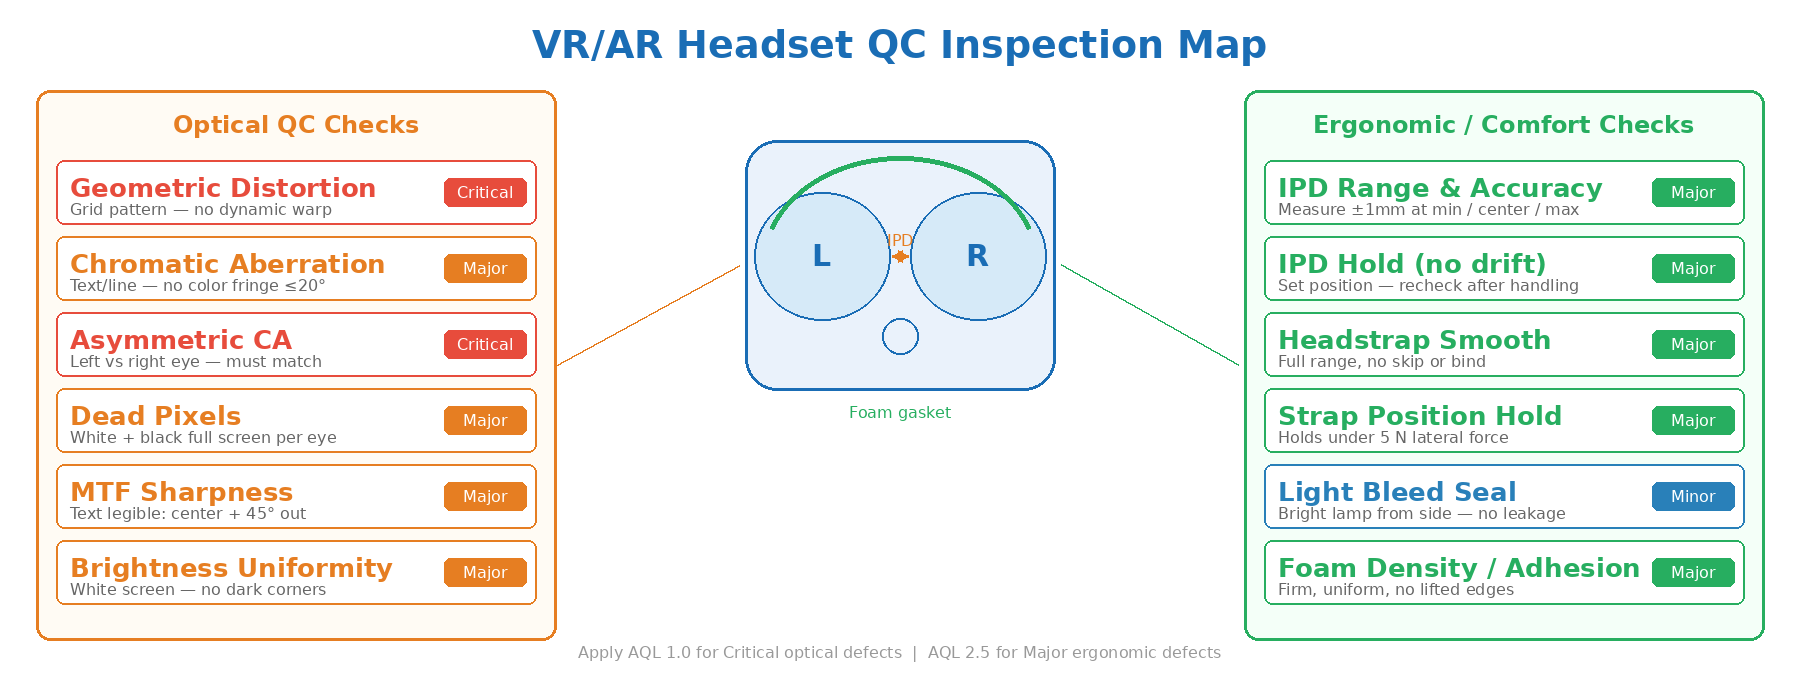
VR/AR headset QC inspection map: optical distortion zones, IPD alignment, and ergonomic check points.
MTF, Uniformity, and Dead Pixels
Beyond distortion and chromatic aberration, the optical quality specification includes three additional measurable parameters that should be on every VR headset inspection checklist:
MTF (Modulation Transfer Function): A measure of image sharpness — how well the lens resolves fine detail. In a factory context, the practical proxy for MTF is text readability across the full display field. Display 12pt text at the center, then at 45° from center in each direction. If text that is legible at center becomes blurry or unreadable before the lens edge, the MTF performance is below acceptable for that design. Lenses from the same product line should deliver consistent sharpness across all units in the sample.
Luminance uniformity: The display brightness should be consistent across the field of view. Display a pure white screen and observe whether any quadrant or zone appears noticeably dimmer or brighter than the rest. A dark corner is a Major defect (display backlight or lens transmission issue); a hotspot in the center versus dim edges may be within specification for some designs but should be consistent across all sampled units.
Dead and stuck pixels: At near-eye display distances, even single dead pixels are visible in normal use. Display a pure white screen (for dead black pixels) and a pure black screen (for stuck bright pixels) on each eye's panel. Any dead or stuck pixel that falls within the central 80% of the display should be classified as a Major defect.
IPD Alignment and Adjustment QC
Why IPD Is the Most Critical Ergonomic Specification
Interpupillary distance (IPD) — the physical separation between a user's pupils — typically ranges from 58mm to 72mm for adults. If the headset's lens spacing doesn't match the user's IPD, the visual consequences are immediate: eye strain and headaches from the eyes being forced to converge unnaturally. A headset that forces incorrect eye convergence cannot be used comfortably for more than 20–30 minutes regardless of how good its display is.
Entry-level VR headsets often use a fixed IPD, typically optimized for an average IPD of around 63–64mm. Users with an IPD significantly outside this range — roughly anyone below 60mm or above 67mm — will experience meaningful visual discomfort. A peer-reviewed comparative study published on arXiv found that digital IPD adjustment (lenses fixed, image shifted in software) caused severe discomfort for a subset of users compared to physical IPD adjustment, as the Samsung Odyssey+ design with digital-only IPD demonstrated across multiple test subjects.
IPD Testing at the Factory
For headsets with physical IPD adjustment mechanisms (dial, slider, or stepped positions), the QC test must verify the mechanism functions across its full specified range without binding, skipping steps, or failing to hold its set position. Test at minimum, center, and maximum positions. Confirm that the lens spacing at each position matches the labeled value (use a ruler — the measurement should be within ±1mm of the specified value). Confirm that the mechanism holds its position when the headset is handled normally; a slider that drifts back toward center after the user lets go is a Major defect.
For headsets with fixed IPD, verify the actual lens spacing against the specified value. A manufacturing tolerance variation of more than ±1mm from the specified IPD will affect every user who purchases that unit. Check at least 10% of the functional sample for this measurement as part of dimensional inspection.
| Optical / Ergonomic Parameter | Test Method | Pass Standard | Defect Class |
|---|---|---|---|
| Geometric distortion (central field) | Grid test pattern, visual inspection | No dynamic warping on head movement | Critical |
| Chromatic aberration (within 20° center) | White text on black background | No visible color fringing | Major |
| Asymmetric CA (left vs right eye) | CA test pattern, both eyes | Both eyes visually matched | Critical |
| Dead pixels (central 80% of display) | Pure white / pure black screen | Zero dead/stuck pixels in central zone | Major |
| IPD mechanism accuracy | Ruler measurement at min/center/max | Within ±1mm of labeled value | Major |
| IPD position hold (no drift) | Set position, handle unit, recheck | No movement from set position | Major |
| Foam/silicone gasket — uniformity | Visual + tactile check | Uniform density, fully adhered, no gaps | Major |
| Headstrap mechanism | Adjust through full range, apply force | Smooth adjustment, holds under 5N lateral force | Major |
Wearable Comfort Checks
Facial Interface and Foam Gasket Quality
The facial interface — the foam or silicone gasket that seals the headset against the user's face — is the second most common source of comfort complaints after optical issues. High-quality facial interfaces use hypoallergenic silicone or pleather-based padding that is easy to clean, non-absorbent, and shaped to distribute pressure evenly across the forehead and cheeks rather than concentrating it on the brow and nose bridge.
Factory QC checks for the facial interface should include: foam density consistency (compress the foam with a finger — density should be firm but resilient, and consistent unit-to-unit); adhesive bonding (the foam should be uniformly adhered to the plastic surround with no lifted edges or air gaps that would allow light bleed); material surface quality (no cuts, tears, thin spots, or visible bubbles in the foam). For silicone interfaces: no visible mold parting lines that would contact the skin, uniform wall thickness, and no surface tackiness from uncured material.
Budget headsets often use lower-density polyurethane foam that compresses too quickly under face pressure, losing its shape and light-seal properties after minimal use. Your QC checklist should specify minimum foam density (Shore hardness or density in kg/m³) if this is a recurring quality issue with your supplier. Pre-production inspection that verifies incoming foam material meets specification before it goes into assembly is the most cost-effective intervention point.
Headstrap and Weight Distribution
VR headsets are front-heavy by design — the display and optical hardware is in the face unit. Weight distribution, not total weight, is the key comfort metric — a heavier headset with good counterbalancing can feel lighter than a nominally lighter one that acts as a lever pulling forward on the face. The inspector should check:
- Headstrap adjusts smoothly through its full range in both directions (tighten and loosen)
- The strap holds its set position — a ratchet or dial mechanism that slips under light pressure is a Major defect
- For headsets with over-head straps, the top strap attachment points are secure on both sides with no play or creak
- The overall weight balance can be assessed by holding the headset at the strap attachment point and observing whether the face unit tilts dramatically forward — this indicates the design will create neck strain in use
Light Bleed and Environmental Seal
Light bleed — ambient light entering the headset from around the gasket and breaking immersion — is a functional comfort defect that is easy to test. Place the headset on a face-shaped dummy or use an inspector's own head in a normally lit room. Illuminate the room with a lamp from the side and front. Any visible light entering from around the nose bridge, cheek gaps, or brow gap = light bleed = Minor or Major defect depending on severity. A complete failure of the light seal (significant ambient light visible in the display) is a Major defect.
Building the VR/AR Headset QC Checklist
What a Complete Checklist Covers
A pre-shipment inspection checklist for VR/AR headsets should integrate both the optical tests and the comfort checks into a structured protocol. Effective QC checklists specify not only what to test but the exact procedure, equipment, and pass/fail criteria for each item — otherwise inspectors apply their own judgment and results become inconsistent across visits and vendors.
A complete VR/AR headset inspection checklist should cover: visual and cosmetic inspection (housing, lens surfaces, cable condition, packaging); functional power-on and display check; optical distortion visual test (grid pattern); chromatic aberration test (text/line pattern); dead pixel check (white and black screens); IPD mechanism accuracy and hold; display brightness and uniformity (white screen, visual); facial interface quality (density, adhesion, surface); headstrap function and hold; light bleed check; and button/sensor functional check (power, volume, tracking sensors).
AQL Thresholds and Sample Size Considerations
The optical tests are functional tests, not cosmetic inspections. Apply AQL 1.0 or tighter for Critical and Major optical defects (dynamic distortion, asymmetric CA, dead pixels). Apply AQL 2.5 for comfort-related Major defects (foam quality, IPD drift). Apply AQL 4.0 for Minor defects (cosmetic marks, light bleed at extreme periphery).
Note that lens-related optical defects can be introduced by the lens assembly process in a way that is not reflected in earlier sub-component tests. Pre-shipment inspection of assembled headsets — not just component checks — is necessary because the optical profile of the seated lens in the final housing may differ from the lens tested in isolation. The same lens tested at the optical bench may show acceptable distortion, but once seated in a plastic housing that flexes under assembly torque, the curvature profile changes.
For large orders, a during-production inspection at 30–50% completion provides an early check on whether the assembly process is producing consistent optical results before the full batch is committed.
Frequently Asked Questions
Can I inspect VR headset optical distortion without lab equipment?
Yes, for most factory-detectable defect types. The visual test patterns needed to identify geometric distortion, chromatic aberration, dead pixels, and brightness uniformity can be loaded onto the headset's own display — a simple test image file is sufficient. The inspector uses their own eyes to evaluate the result according to defined pass/fail criteria. Lab equipment (MTF benches, Shack-Hartmann wavefront sensors, colorimeters) provides quantitative measurements for R&D and production engineering, but a well-designed checklist with visual pass/fail criteria can catch the defects that cause actual customer complaints without specialized tooling.
How does lens type affect which defects I should prioritize in inspection?
Fresnel lenses: prioritize god-ray/glare testing and ring artifact visibility in addition to standard distortion and CA checks. Aspheric lenses: prioritize pupil swim (dynamic distortion with head movement) and sweet spot size. Pancake lenses: prioritize ghost image testing and haze uniformity, as unwanted reflections between lens elements create these specific artifacts. The lens type should be confirmed against specification during the pre-production inspection, since substitution of a different lens type or grade is a known risk in cost-reduction scenarios.
What is the biggest ergonomic defect that drives VR headset returns?
IPD mismatch is consistently the leading ergonomic return driver. Users who purchase a fixed-IPD headset that doesn't match their own pupillary distance experience immediate eye strain, headaches within 15–20 minutes of use, and inability to get the image to focus correctly. For importers, this means verifying not just that the IPD adjustment mechanism works, but that your product specification clearly communicates the IPD range to buyers — and that the actual lens spacing on production units matches the specified value.
Should I test every unit for optical quality or use sampling?
AQL sampling is appropriate for optical tests, with tighter thresholds than cosmetic inspection. However, a 100% power-on check (every unit powered on, display confirmed active on both eyes with no dead zones) should be confirmed as part of the factory's own outgoing QC. If any display failures appear in your AQL sample, expand the sample — display defects can occur in clusters from the same panel production lot, and a low sample that happens to miss a defective sub-lot will leave you with returns.
Optical and ergonomic quality issues in VR/AR headsets are hard for customers to articulate and easy for factories to miss without a structured test protocol. TradeAider's inspection team builds functional display tests — including optical distortion, chromatic aberration, IPD verification, and comfort checks — into pre-shipment inspection checklists for consumer electronics buyers sourcing from China. Book a pre-shipment inspection or review TradeAider's inspection standards to understand how a professional QC checklist is structured for complex products.

Related Articles


Grow your business with TradeAider Service
Click the button below to directly enter the TradeAider Service System. The simple steps from booking and payment to receiving reports are easy to operate.