- About Us

- Our Services
- Your Industry
- Resources
- News & Blog
Quality control inspections in manufacturing are structured checks that compare production goods against buyer requirements before the buyer releases payment or shipment. A beginner should learn five ideas first: define the requirement, choose representative samples, inspect the right points, classify defects, and decide whether to release, hold, sort, rework, test, or reinspect.
ISO 9001 is a useful starting point because it frames quality around meeting requirements consistently. A beginner does not need to become a standards expert, but they do need to know that inspection begins with clear requirements, not with a factory walk-through.
When inspection uses sampling, ISO 2859-1:2026 provides the AQL-related attribute sampling framework many importers apply. The beginner lesson is simple: sample size and acceptance criteria should come from a plan, not from whatever cartons are easiest to open.
ISO/IEC 17020 focuses on inspection-body competence and consistency. For importers, that means the inspector needs a defined scope, product file, sample plan, tools, and reporting format before the visit.
- Inspection starts before the visit: PO, spec, approved sample, defect classes, and packing rules must be ready.
- PPI, DPI, and PSI answer different timing questions: setup, process drift, and final release are not the same risk.
- AQL is not a guarantee of zero defects: it is a sampling decision tool that needs lot structure and defect severity.
- The report should create an action: beginners should look for release, hold, sort, rework, retest, or reinspection logic.
How Do Manufacturing Quality Control Inspections Work for Beginners?
Manufacturing quality control inspections work by checking a defined sample of goods, components, packaging, labels, or documents against buyer requirements, recording defects or measurements, classifying severity, and using the result to decide whether the order can ship or needs correction.
Beginners often confuse inspection with quality assurance. ASQ quality terminology helps separate the ideas: quality control checks the product or lot, while quality assurance focuses more on the system intended to prevent problems.
A first inspection plan should answer six questions: what product requirements matter, which units or cartons represent the lot, which checks must be performed, what counts as critical/major/minor, what evidence the report must include, and what action follows if the result fails.
For process problems, NIST process-control guidance is a useful mental model: repeated signals deserve investigation. A beginner should not treat every defect count as equal; concentration by SKU, line, date, or material can change the release decision.
Beginner Inspection Terms Explained
These are the terms importers should understand before booking their first inspection.
| Term | Plain Meaning | Beginner Mistake | Better Rule |
|---|---|---|---|
| Specification | What the product must match | Sending only a photo | Send PO, spec, sample, tolerances |
| Approved sample | Physical or documented reference | Assuming factory remembers it | Freeze sample and change log |
| AQL | Sampling and acceptance logic | Treating it as zero-defect promise | Use with defect classes |
| Critical defect | Safety, legal, or unusable issue | Classifying too late | Define before inspection |
| Major defect | Likely return or buyer rejection | Calling all defects minor | Tie to customer impact |
| PSI | Final packed-lot release check | Using it for every risk | Add PPI/DPI when earlier evidence is needed |
The beginner mistake is to book an inspection before defining the decision. An inspector can visit a factory and produce photos, but the buyer still needs to know what counts as acceptable and what result stops shipment.
A second mistake is using only one inspection type. Pre-Production Inspection checks setup. During Production Inspection checks drift. Pre-Shipment Inspection checks the finished lot. The right choice depends on when the buyer can still change the outcome.
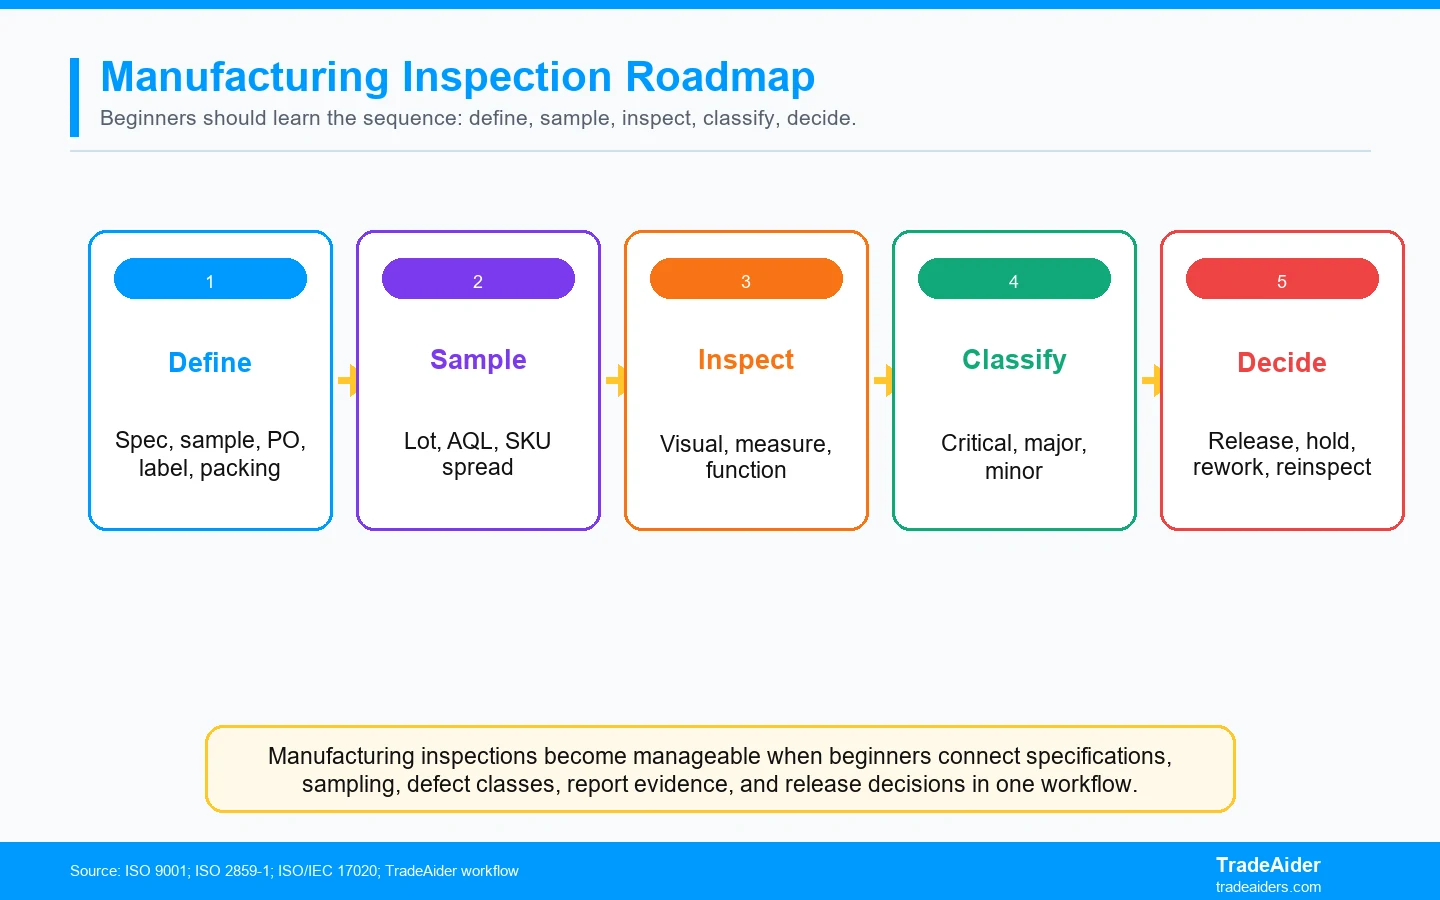
Manufacturing inspections become manageable when beginners connect specifications, sampling, defect classes, report evidence, and release decisions in one workflow.
The Beginner Workflow Starts Before the Factory Visit
Most first-time inspection problems come from missing preparation, not from the inspection day itself.
Prepare the product file first
The product file should include the PO, specification sheet, approved sample, drawings, measurements, materials, labels, packaging, accessories, barcode, carton marks, test reports, and any buyer-specific requirements. If the inspector does not have the file, the inspection becomes a general workmanship review.
A beginner should also write defect examples before the visit. What would stop shipment? What can be sorted? What needs rework? What needs testing? These answers turn inspection from a report into a decision tool.
Choose inspection timing by risk
Use PPI when materials, samples, tooling, labels, or supplier readiness are uncertain. Use DPI when defects can spread during production. Use PSI when the finished and mostly packed lot needs release evidence before payment or shipment.
A beginner often starts with PSI because it is familiar. That is fine for a stable repeat order, but it may be too late for new suppliers, new products, regulated items, tight tolerances, or high-value launches.
Sampling, Defect Classes, and Reports Are the Core Skills
Once the product file is ready, beginners should focus on sample spread, severity, and report action.
Sample spread matters as much as sample size
If a shipment includes multiple SKUs, colors, sizes, cartons, production dates, factories, or packing versions, samples should be spread across those groups. A clean sample from easy cartons may miss the subgroup that creates returns.
The report should show which cartons and subgroups were checked. Without identity evidence, the buyer may know a defect exists but not where to correct it.
Defect classes prevent late arguments
Critical, major, and minor defects should be defined before inspection. A sharp edge, missing safety warning, failed function, wrong label, loose part, carton shortage, scratch, or color mismatch may have different severity depending on product and destination.
Good reports show severity, count, photos, location, and whether the result meets the acceptance rule. Beginners should look for that decision structure rather than only asking whether the inspection passed.
Scenario Estimate: First Inspection Mistakes Usually Cost Time
The first inspection fee is rarely the biggest cost; the bigger cost is discovering a fix too late.
Assume a first-time importer orders 6,000 units and books only a final PSI. The inspection finds a repeated label error on 1,200 units that could have been corrected before packing. The buyer now faces carton opening, relabeling, repacking, reinspection, and a shipment delay.
If a one-day DPI had found the label mismatch when 30% of production was complete, the buyer could have corrected the process before the rest of the order was packed. The inspection fee may feel like the visible cost, but the timing loss is the real cost.
This scenario is not a universal rule. It teaches beginners to ask: what is the earliest check that can still change the outcome?
How Beginners Should Read the First Inspection Report
The report is not the finish line; it is the evidence file for the buyer's next decision.
Read the report by identity, severity, and concentration
Start with identity: product model, SKU, color, size, carton range, production status, packing percentage, and sample selection. If the report does not show what was sampled, the buyer cannot know which goods the findings represent.
Then read severity. Critical defects usually stop release. Major defects may trigger hold, sort, rework, or reinspection depending on AQL and concentration. Minor defects may be accepted, sorted, or negotiated depending on buyer tolerance. Beginners should avoid treating all photos as equal.
Turn the report into supplier instructions
After reading the report, write a short action note for the supplier: which defects must be corrected, which cartons or SKUs are affected, what proof is needed after rework, and whether reinspection is required. This prevents vague messages such as 'please improve quality' from becoming the whole corrective action.
The report should also update the next order. If the first inspection found label mistakes, add label artwork checks earlier. If it found packing damage, add packing review. If it found process drift, add DPI next time. The beginner inspection process improves when every report strengthens the next product file.
Choose the Inspection Action by Order Stage
Beginners should match the action to the point where the order still has room to change.
Before production starts, the useful action is prevention: confirm materials, approved samples, tooling, labels, packaging, and supplier readiness. In early production, the useful action is correction: find drift, isolate the cause, and adjust the process before the whole order repeats the same problem.
Near shipment, the useful action is release control. The buyer needs to know whether finished goods match requirements, whether defects exceed the rule, whether clean subgroups can ship, and whether rework or reinspection is needed. A final report should not create a vague feeling of quality; it should create a clear shipping decision.
This stage-based thinking prevents beginners from asking one inspection to solve every risk. If the risk is setup, inspect before mass production. If the risk is process drift, inspect during production. If the risk is final buyer acceptance, inspect the finished lot before release.
Where TradeAider Fits for Beginner Importers
TradeAider helps beginner importers choose the right inspection timing, define the product file, apply AQL sampling, classify defects, and turn reports into shipment decisions.
If the order is new or the setup is uncertain, Pre-Production Inspection can verify samples, materials, labels, tooling, and readiness before mass production.
If defects may spread, During Production Inspection can check early output. If the finished lot is ready for release, Pre-Shipment Inspection can verify product, packing, quantity, labels, and defect evidence.
For beginners building their first inspection file, TradeAider resources such as the AQL calculator and inspection standard guidance can help define sample logic and defect severity before booking.
SPAR Scenario: The First Inspection Became a Decision Tool
The buyer learned to release clean goods and hold the affected subgroup instead of panicking over one report.
Situation: A new importer ordered 4,800 home accessories from a supplier in China.
Problem: Final inspection found scratches and wrong carton labels, but the buyer did not know whether to reject the shipment.
Action: TradeAider helped classify severity, map findings by SKU and carton range, and define rework plus reinspection for the affected group.
Result: The buyer released clean cartons, held 740 units for label correction and sorting, and updated the next PO inspection file.
Beginner Inspection Booking Checklist
Prepare these basics before booking your first manufacturing inspection.
- PO, product specification, approved sample, drawings, and tolerance rules.
- SKU, color, size, carton, production date, and packing version map.
- Critical, major, and minor defect examples.
- Inspection timing choice: PPI, DPI, PSI, testing, or loading check.
- Required photos, measurements, function checks, and document checks.
- Release, hold, sort, rework, retest, or reinspection rule.
A beginner does not need a perfect system on the first order. They need a clear enough inspection file that the supplier, inspector, and buyer can all understand what must be proven.
After the inspection, save the defects, photos, and decisions. That becomes the starting point for a smarter inspection plan on the next purchase order.
If you are booking your first manufacturing inspection, send TradeAider the PO, spec sheet, approved sample, production status, top risks, and shipment date. The next step is to plan your first manufacturing inspection with the right timing and release rule.
Frequently Asked Questions
What is a quality control inspection in manufacturing?
It is a structured check of products, components, labels, packaging, documents, or production evidence against buyer requirements before the order is released.
Which inspection should beginners start with?
Start with PSI for stable finished goods, but use PPI for setup risk and DPI when defects can spread during production. The best choice depends on risk timing.
Does AQL mean zero defects?
No. AQL is a sampling and acceptance tool, not a zero-defect guarantee. It must be paired with clear defect classes and a defined lot structure.
What should I send to an inspector?
Send the PO, specification, approved sample, drawings, tolerances, labels, packing rules, defect examples, production status, and any testing or compliance documents.
What happens if the inspection fails?
The buyer should decide whether to release clean goods, hold the lot, sort defects, rework products, retest, or reinspect based on severity and concentration.
Related Articles
Grow your business with TradeAider Service
Click the button below to directly enter the TradeAider Service System. The simple steps from booking and payment to receiving reports are easy to operate.