
A visual quality inspection process is not a quick look at finished goods; it is a structured TradeAider-style check that compares sampled goods with buyer requirements, records visible defects, classifies severity, and turns the evidence into a shipment decision. The practical answer is to inspect the risks that can still be changed, record the evidence that proves conformity, and decide whether to release, hold, sort, rework, test, or reinspect before the shipment moves beyond buyer control.
Key Takeaways
- Start with the product file: visual inspection must compare goods with specifications, approved samples, labels, and packing rules.
- Define the sampled lot: sampled units and cartons should represent the shipment, not only the easiest items to access.
- Classify severity before release: critical, major, and minor defects should not be mixed into one general comment.
- Use photos as evidence: overview, close-up, scale, location, and carton identity help the buyer judge whether a defect is isolated or systemic.
Step 1: Review the Product File Before Looking at Goods
A visual quality inspection process starts with requirements, not with eyesight. ISO 9001 connects quality management to meeting requirements and controlling processes. For importers, that means the inspector should review the PO, approved sample, drawings, color standards, size chart, material notes, label files, packing method, barcode files, carton marks, and any customer-specific receiving rules before inspecting units.
ISO/IEC 17020:2026 describes inspection as determining conformity with requirements. That language is important because visual quality inspection should not ask whether goods look generally acceptable. It should ask whether the sampled goods conform to the buyer's defined requirements and whether any visible nonconformity should affect release.
A visual checklist should be product-specific
Generic visual checklists can help with structure, but they rarely catch category-specific failure points. A textile order may need color, stitching, stains, shade bands, measurement, and packing checks. A plastic item may need burrs, sink marks, assembly, odor, color consistency, and function. An electronic accessory may need housing finish, ports, labels, charging fit, and packaging. The product file tells the inspector which visible details matter enough to record.
A product-specific checklist also prevents shallow inspection. If a 6-SKU order has two high-risk colors and one fragile component, the visual process should call those out before sampling, otherwise the report can look complete while missing the most important risk.
Approved samples prevent subjective judgment
Without an approved sample or clear specification, visual inspection becomes subjective. One person may call a color difference acceptable while another calls it a defect. The approved sample, tolerance, and defect classification reduce that debate. They do not remove judgment entirely, but they give the inspector a reference point and give the buyer a reasoned basis for approving release or asking the supplier to correct the issue.
In a 200-unit sample, subjective judgment can turn small differences into long disputes. The approved sample gives the inspector a stable reference for color, finish, assembly, and packing, while tolerances define when a visible difference becomes a reportable defect.
Step 2: Define the Lot and Select the Sample
Visual inspection needs a lot map. The buyer should know total quantity, SKU, color, size, production batch, carton count, packed percentage, and any subgroup that carries special risk. ISO 2859-1:2026 provides AQL-indexed sampling schemes for lot-by-lot inspection by attributes, which is the common logic behind many visual final inspections.
NIST describes acceptance sampling as a practical compromise between checking everything and checking nothing. That compromise works only when the inspected sample represents the lot. If all sampled cartons come from one pallet, one production date, or one easy-access area, the buyer may miss defects concentrated elsewhere.
| Sampling question | Weak process | Better process |
|---|---|---|
| What is the lot? | Only total quantity is known | Quantity, SKUs, colors, sizes, cartons, and production dates are mapped |
| Where are samples taken? | Factory presents easy cartons | Inspector selects cartons across the lot |
| What is inspected? | A few visible surfaces | Required zones, functions, labels, and packing are checked |
| How are findings counted? | General comments | Counts by defect type, severity, and subgroup |
| How is action decided? | Supplier says acceptable | Buyer rule defines release, hold, sort, rework, or reinspection |
A visual inspection process can be simple, but it should never be vague. The lot map is what allows a buyer to trust that the report describes the shipment rather than one convenient corner of the warehouse.
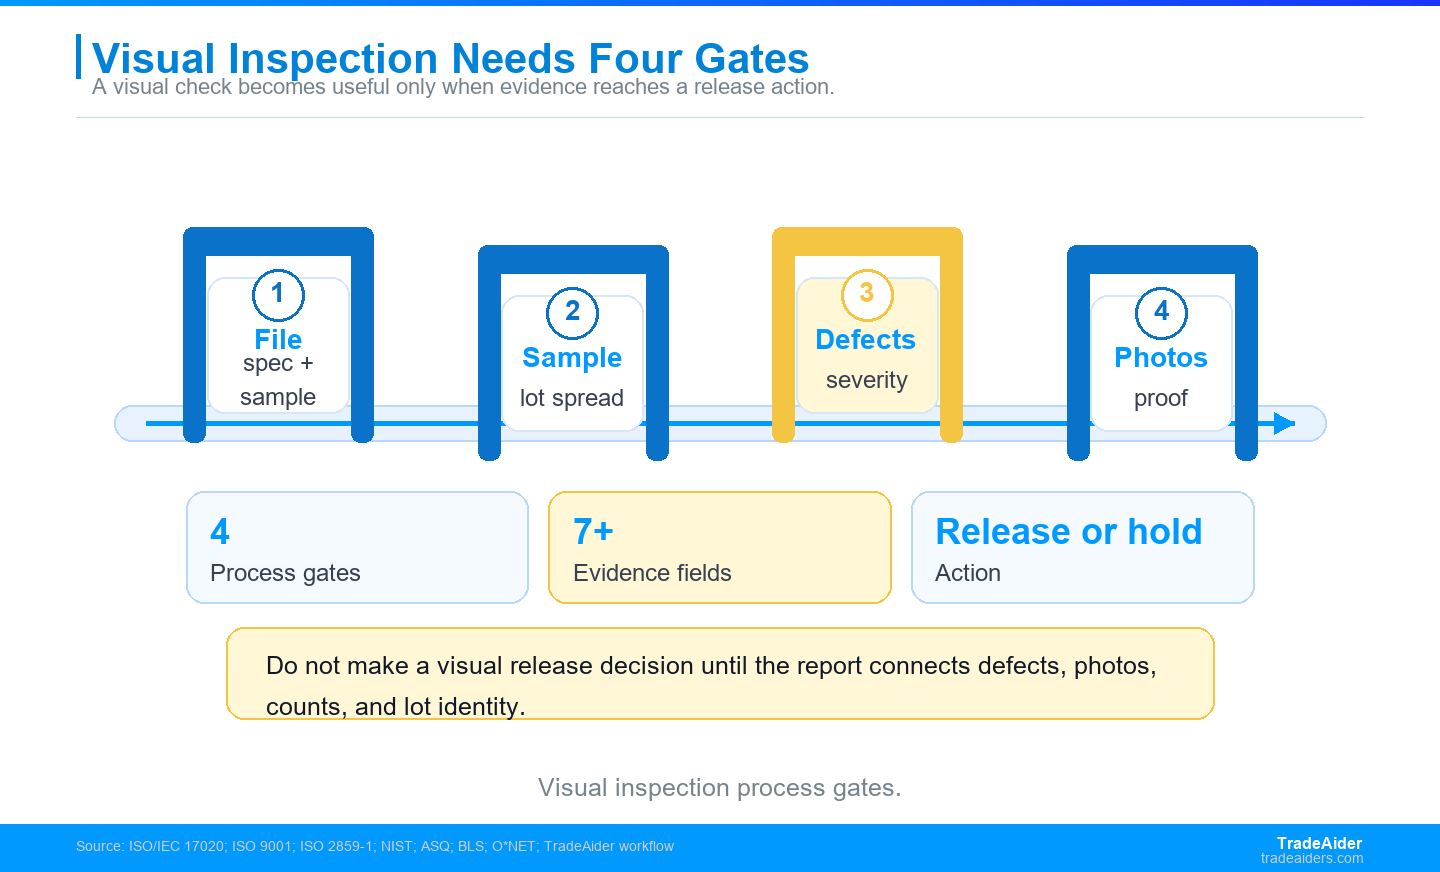
Visual quality inspection should move from requirement review to sample evidence, defect classification, photo proof, and release action without skipping the lot map.
Step 3: Inspect Product Appearance, Workmanship, and Function
Visual checks usually cover appearance and workmanship first: scratches, dents, stains, loose threads, poor bonding, rough edges, color deviation, print defects, deformation, missing parts, incorrect assembly, contamination, and obvious damage. BLS describes quality control inspectors as examining products and materials for defects or deviations from specifications, which is the core of this step.
O*NET also includes practical inspection tasks such as testing, sorting, sampling, measuring, and weighing. A strong visual process therefore does not stop at the surface when simple function checks or measurements are part of the buyer requirement. If a zipper, button, switch, lid, wheel, strap, or port is visible and functional, the inspection should define the expected check method.
Visual defects still need severity rules
The same visible defect can carry different severity depending on product use, customer expectation, and destination rules. A tiny scratch on industrial packaging may be minor, while a sharp edge on a children's accessory may be critical. A label misprint may be cosmetic for an internal component but major for a retail item. Severity rules prevent the report from becoming a list of complaints and help the buyer decide whether findings affect safety, function, saleability, or appearance.
Severity rules also protect the buyer from overreacting to harmless cosmetic marks or underreacting to dangerous defects. A 1-millimeter scratch and a sharp edge should not travel through the same decision path just because both are visible.
Function checks should be repeatable
Many products need simple function checks during visual inspection, but those checks should be repeatable. The report should state how the function was checked, how many units were checked, what tools or accessories were used, and what failed. A vague note such as function OK is weaker than a short method with counts and photos. Repeatability is what makes a later supplier discussion practical rather than argumentative.
Repeatability is especially important when the supplier disputes a finding. If 20 of 200 sampled units fail the same closure check using the same method, the report gives the buyer a stronger reason to request sorting, rework, or reinspection.
Step 4: Classify Defects and Record Evidence
ASQ explains that attributes sampling supports accept-or-reject decisions from sample evidence. In visual inspection, that means each finding should be classified as critical, major, or minor according to the buyer's rule. A critical defect may block release immediately. A major defect may affect function, saleability, or customer acceptance. A minor defect may be acceptable within limits but still worth tracking.
Evidence should include more than a single close-up. The buyer should see an overview photo, a close-up photo, scale or measurement where relevant, defect location, SKU or color, carton identity, and count. If a defect is repeated, the report should show whether it appears across the lot or is concentrated in one subgroup. This is what turns a visual finding into a release decision.
| Defect severity | Typical meaning | Buyer action |
|---|---|---|
| Critical | Safety, legal, or unusable condition | Hold, investigate, test, or reject |
| Major | Function, saleability, fit, or customer acceptance risk | Hold, sort, rework, or reinspect |
| Minor | Cosmetic or low-impact deviation within agreed limits | Track, accept within limit, or request correction |
| Unclassified | Finding without agreed rule | Clarify before final release |
Scenario Estimate: Why Process Discipline Matters
Consider a 10,000-unit shipment where the inspector checks 200 units visually. If the inspector only reports that several defects were found, the buyer has little decision value. If the inspector records sample spread, defect type, severity, photo evidence, measured examples, and subgroup concentration, the same 200-unit sample becomes much more useful.
The buyer can then ask sharper questions. Are the defects spread across the whole lot or concentrated in one color? Are they cosmetic or functional? Do they affect customer use? Are they within the agreed acceptance rule? Should the supplier sort one subgroup, rework all goods, test a hidden claim, or release the shipment? Process discipline is what lets a small sample answer those questions.
Calculated from 10,000 units and a 200-unit visual sample, 200 divided by 10,000 equals 2 percent of the lot inspected as direct evidence. Calculated from 14 minor defects and 5 major defects in the same sample, 19 total findings divided by 200 equals 9.5 percent of sampled units with visible issues, but severity still decides release risk. Calculated from 5 photo fields per major defect, overview, close-up, scale, location, and carton identity means 25 evidence fields when 5 major defects are reported properly. Calculated from USD 0.18 per unit sorting and a 1,500-unit suspect color subgroup, 1,500 x USD 0.18 equals USD 270 of handling before replacement. Calculated from 4 visual zones per item, front, back, edge, and functional area means 800 visual zones across a 200-unit sample. Calculated from a 1-day recheck delay, 1 x 24 hours equals 24 hours of lost release time before any rework begins.
Step 5: Connect Visual Findings to Release Action
NIST describes an acceptance sampling scheme as a sampling plan plus rules for making decisions. Visual inspection should follow the same principle. The report should not end with isolated observations; it should connect sample results, defect severity, packing checks, label checks, and lot identity to a buyer action.
The usual actions are release, hold, sort, rework, test, or reinspect. When the shipment is final, Pre-Shipment Inspection can support this release decision after goods are 100 percent complete and at least 80 percent packed. When the problem appears earlier, During Production Inspection can preserve correction leverage before the final shipment is ready.
- Release only when the sample, severity, and packing evidence support acceptance.
- Hold when critical findings, repeated major findings, or document gaps remain unresolved.
- Sort when defects are concentrated in a defined subgroup.
- Rework when defects are correctable and the buyer can verify correction evidence.
- Test when visual evidence cannot prove safety, material, or performance claims.
- Reinspect when the buyer needs proof after sorting or rework.
How TradeAider Runs Visual Inspection for Importers
TradeAider visual inspection services are designed around buyer evidence. For early readiness, Pre-Production Inspection can confirm files, samples, materials, and labels. During production, During Production Inspection can check visible defects, process drift, and correction evidence. Before shipment, Pre-Shipment Inspection can verify the completed and packed lot with product checks, AQL sampling, packing review, label review, and report photos.
When visual inspection is not enough, TradeAider can coordinate product testing services so material, safety, restricted-substance, or performance claims are not overstated. The AQL calculator can help estimate sample size, and the inspection standard guide can help align severity rules before the inspector arrives.
To prepare the process, send the product file, approved sample, critical-to-quality points, defect classifications, quantity, SKU spread, packing status, shipment deadline, and known supplier issues. The next step is to contact TradeAider while the inspection result can still change the shipment outcome.
Step-by-Step Visual Inspection Checklist
Use this checklist to keep the process complete without turning it into a long inspection manual.
- Review PO, approved sample, drawings, labels, packing rules, tolerances, and customer requirements.
- Map the lot by quantity, SKU, color, size, carton count, production batch, and packed status.
- Select samples across the lot rather than accepting only factory-presented units.
- Inspect appearance, workmanship, dimensions, function, labels, accessories, and packing.
- Classify defects as critical, major, minor, or pending buyer clarification.
- Photograph defects with overview, close-up, scale, location, and carton identity.
- Count findings by type, severity, and subgroup.
- Recommend release, hold, sort, rework, testing, or reinspection based on the agreed rule.
A visual quality inspection process is successful when the buyer can understand the shipment risk without needing to reinterpret the report from scratch. TradeAider can apply this 8-step checklist so photos, counts, severity, and lot identity support the same release decision.
Frequently Asked Questions
What is a visual quality inspection process?
A visual quality inspection process is a structured method for checking sampled goods against buyer requirements before release. It records visible defects, classifies severity, and supports a release decision with evidence. It normally includes product file review, lot mapping, sample selection, appearance checks, function checks, defect photos, counts, and final action notes.
Can visual inspection replace product testing?
Visual inspection can identify visible quality issues, but it cannot prove hidden properties that require laboratory or technical evidence. It can cover appearance, workmanship, labels, packing, and some simple function checks. Material composition, chemical safety, restricted substances, electrical safety, or long-term performance need testing, certificates, or technical evidence alongside inspection.
What photos should be included in a visual inspection report?
A good report should include photos that explain the finding, not only images that show the product generally. Include overall product photos, close-ups of defects, scale or measurement photos when relevant, label and packaging photos, carton identity, sampled-carton evidence, and enough context to show whether defects are isolated or repeated. Photos should support counts and severity, not decorate the report.
When should visual inspection happen?
Visual inspection should happen at the production stage where the finding can still change the buyer's release or correction decision. PPI checks readiness, DPI checks production drift, and PSI checks final release when goods are complete and packed enough to represent the shipment. Hidden risks should be tested before the shipment deadline rather than judged by appearance alone.
Articles Connexes

Développez votre entreprise avec le Service TradeAider
Cliquez sur le bouton ci-dessous pour accéder directement au Système de Service TradeAider. Les étapes simples de la réservation et du paiement à la réception des rapports sont faciles à utiliser.