

A camping chair inspection should follow the product from its carry bag to its fully opened position, through the agreed load check, and back into the bag. Confirm that the frame is correctly engaged, the seat and its attachments remain sound, the feet support the chair, and folding does not expose an unresolved pinch hazard. Then check that the complete chair can actually be packed and carried as supplied.
For importers, a weight-capacity label and an attractive fabric sample leave important questions unanswered. A loose joint may appear only after repeated folding; a reinforced seat corner may open under load; a bag may fit the frame only when an accessory is left out. The checks below cover ordinary adult camping chairs, with different steps for hinged folding frames and frames assembled from separate tubes. Children's chairs and specialized reclining or rocking designs require additional assessment of their particular risks.
The Camping Chair Checks to Complete Before Shipment
Use this checklist with the approved chair, instructions, drawings and inspection criteria. Record each sample's model, color, carton identification and test configuration. Agree numerical loads, durations, cycles, tolerances and sample quantities before the visit; where these are absent, report the missing criterion instead of inventing a pass limit.
- Static load: apply the specified load through the prescribed contact surface and position. Record frame displacement, joint movement, seat damage and the condition after unloading. Compare with the agreed structural and deformation limits.
- Folding locks and connections: fully open or assemble the chair using its instructions. Check every fitted latch, brace and tube connection, then repeat the specified opening and closing sequence. Engagement must match the approved design without an improvised adjustment.
- Fabric seams and attachments: inspect seat corners, sleeves, webbing, backrest joints and stitching before and after loading. Record broken threads, fabric tearing, yarn movement or attachment damage separately, with the location and extent.
- Feet: verify that each required cap or foot is present, correctly fitted and retained. Check contact on the specified inspection surface, then inspect again after the functional sequence for cracks, detachment or exposed tube ends.
- Pinch points: observe hand positions and moving gaps throughout normal unfolding, adjustment and folding. Use the applicable assessment method for clearances; never test a closing gap with a finger.
- Carry bag: repack the actual chair and all included parts using the instructed sequence. Close the bag and check seams, zipper or drawcord, handles and straps under the agreed carrying check.
A useful result states the action, condition and observation together: for example, which seat corner opened after which load sequence. Keep before-and-after photographs and note any supplier intervention. “Chair passed” alone does not tell the buyer whether all six areas were examined.
First Confirm That the Frame Is Fully Open or Assembled
Inspect the chair's actual securing arrangement before loading it. A hinged frame may use a latch, sliding collar or over-center brace; a lightweight take-apart chair may rely on fully seated tube joints and correctly fitted fabric pockets. Mark a lock check as not applicable only when the approved construction has no separate lock, and still examine the connections that hold that design together.
Some products also lock for transport. The manufacturer describes the Kijaro Dual Lock Chair as locking in both its open and folded positions. On such a design, a working transport lock does not demonstrate that the open-position lock is engaged. Identify and test the intended function of each locking position.
Follow the supplied sequence on samples taken from production cartons. Watch the mechanism reach its intended stop and inspect the contact or engagement point where accessible. Check for burrs, distorted brackets, loose rivets and fabric caught in the mechanism. Do not rely on a click alone or ask a factory worker to force a reluctant latch into place before recording the condition.
For a segmented tube frame, verify that each tube is fully inserted in its hub or mating tube and that the seat pockets are installed in the correct locations. An internal elastic cord can keep the pieces together during packing without proving that a joint is seated. Compare the assembly with the approved instructions, not with the shape of a different chair.
Complete the agreed opening and closing cycles, checking whether engagement changes, joints loosen or fabric becomes trapped. Record the cycle count and any rising operating force. If a latch will not engage or a joint moves unexpectedly, investigate before continuing the load check. Filing a bracket or replacing a rivet during inspection creates a modified sample, not evidence that the original packed chair worked.
Run the Static Load Check with Defined Conditions
A static load check holds a specified load under defined conditions. Cyclic durability and impact tests use separate methods. Its result depends on where and how the load is applied, the chair's configuration, the support surface and the duration. A capacity claim alone does not define those conditions. Record the applied force or mass and the loading fixture rather than describing a person briefly sitting on the chair as a controlled test.
For adult outdoor seating, the public scope of BS EN 581-2:2026 includes strength, reliability and stability for camping, domestic and contract use. It excludes resistance to ageing and degradation from light, temperature and moisture. Select the applicable use category and full test method; a factory static check does not establish complete compliance or outdoor weather resistance.
Before loading, photograph the opened frame, fitted seat and securing mechanisms. Establish the required reference measurements. Apply the agreed load with suitable equipment in a controlled area, keeping people out of the potential collapse zone. Observe deflection—the displacement under load—along with joint opening, frame spreading, attachment movement and seat damage. After unloading and any specified recovery period, compare dimensions and engagement with the initial condition.
Separate recoverable flexing from permanent deformation using the product's limits. Fabric sag can also affect the result: the seat may approach a cross-member or pull a corner out of position even if the metal tubes remain intact. Stop if a component cracks, support is lost or the setup becomes unsafe. Record an interrupted test as interrupted and describe why it stopped.
If seat, backrest or armrest loads are required, identify each method separately. Passing a centered seat load does not prove stability while leaning sideways or strength when pushing on an armrest. Repeated loading, impact and stability tests answer additional questions and should be commissioned with their prescribed equipment and conditions when required by the product specification.
Inspect the Fabric Where It Transfers Load to the Frame
Inspect the whole seat, but concentrate on corners, pole pockets, sleeves, webbing junctions and other attachments that connect the fabric to the frame. Check the material and seam construction against the approved reference, including reinforcement placement, seam allowance and stitch pattern. A line of neat stitches is not enough if a supporting pocket is mispositioned or its fabric edge is barely caught by the seam.
After the agreed load sequence, describe what changed. Broken stitching means the sewing thread has failed. Seam slippage means fabric yarns have shifted at the seam, producing an opening that can occur while stitches remain intact. A fabric tear is a rupture in the material itself. These observations help the supplier examine the relevant construction; they do not, by themselves, prove the root cause.
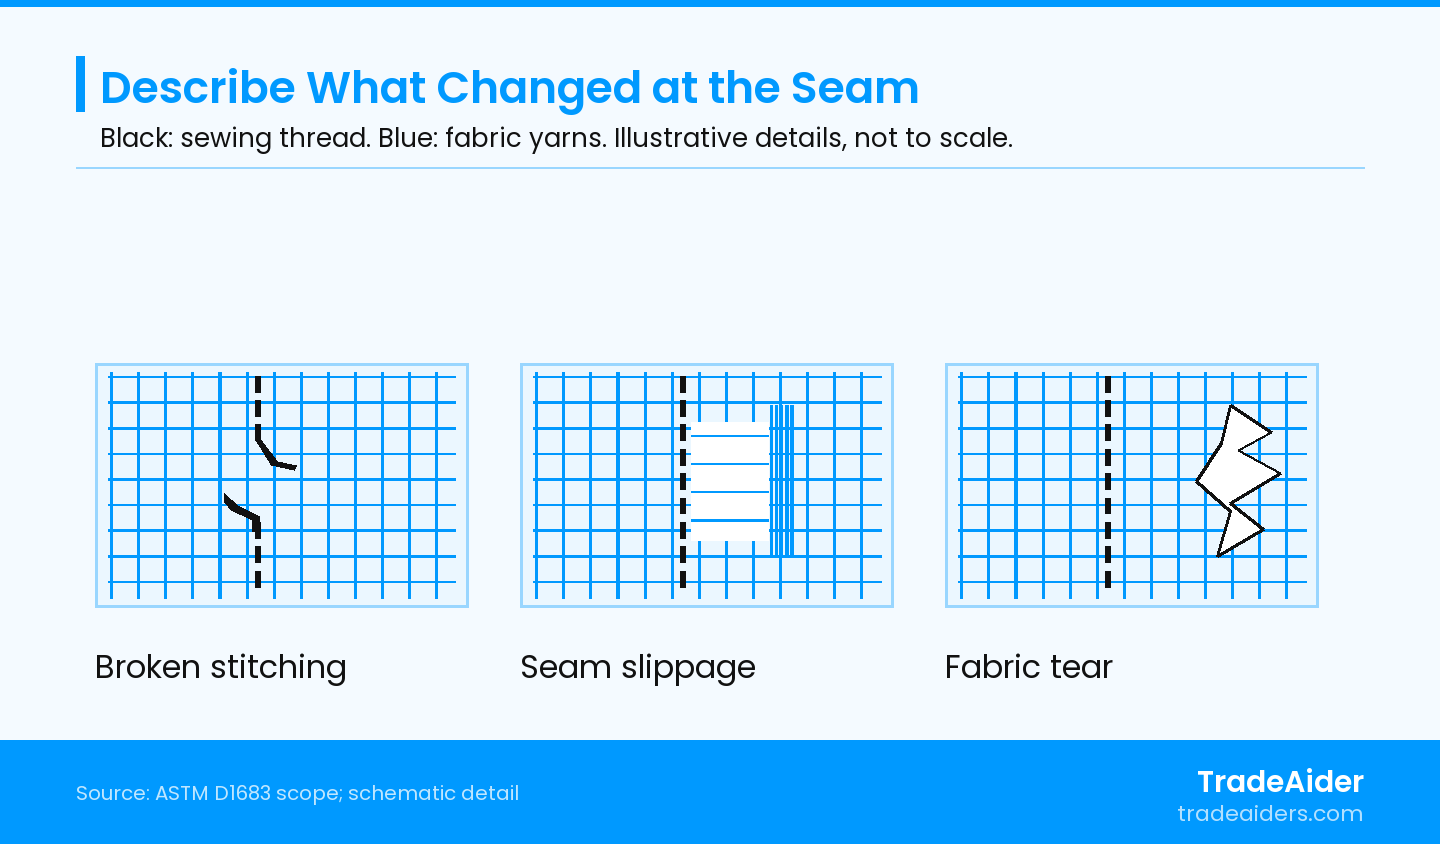
Illustrative woven-fabric details. Record the location and extent of the change; these appearances alone do not establish its cause or a laboratory strength result.
For laboratory assessment of woven seams, ASTM D1683/D1683M-22 measures sewn-seam strength with force applied perpendicular to the seam and addresses stitching failure and yarn slippage. Its scope also states that it does not predict actual seam wear. A visual factory check or informal hand pull is not that test; select a method suitable for the actual woven, knitted or mesh construction.
Check load-bearing straps and their connections as carefully as the seat panel. In its February 2018 Stargaze recall, CPSC identified failure of seat straps as a fall hazard on the specified NEMO camping chairs. This historical recall does not characterize other chairs; it shows why inspecting only the visible fabric panel can miss a supporting component.
Hypothetical example: a chair completes the agreed static load sequence without bent tubing, but the post-test photograph shows an opening beside one seat-pocket seam. The stitches remain continuous while the fabric yarns have moved. Record the seam opening and compare it with the specified limit; do not accept the chair solely because the frame is straight. The supplier should examine that seam assembly, then the corrected construction should undergo the relevant repeat checks.
Check Foot Retention and Ground Contact as Different Issues
A foot can be securely attached yet sit unevenly, and a chair can stand evenly while a cap is loose. Inspect both conditions. Confirm the correct foot type, count and orientation, then check retention by the agreed method. Look for splits around the tube, incomplete seating, loose inserts and sharp metal exposed through a damaged cap.
Use the specified flat, firm inspection surface first. Check whether every intended support contacts it and whether the frame rocks before and after loading. If movement appears, inspect the frame geometry and foot fit before assuming that the floor caused it. Any adjustment must follow the design; inserting an unapproved shim beneath one foot changes the test setup.
Soft-ground suitability is a separate question. Broad feet or an optional ground sheet may be intended for sand or soil, but success on a hard floor does not validate that use. Define the surface, accessory and assessment conditions if the buyer requires a soft-ground check. Avoid presenting one informal test on nearby grass as proof of performance on all outdoor terrain.
Observe Moving Gaps Throughout Folding and Adjustment
Pinch-point inspection follows the movement of the chair, not just its fully open position. Observe where a user's hands are directed by the instructions and where tubes, hinges, braces or sliding collars approach one another. Look for fabric or handles that encourage a grip near a closing gap and for guards that shift during operation.
Accessible surfaces also need attention. BSI's overview of BS EN 581-1:2017 describes general safety requirements for adult outdoor seating and tables, including protected edges and corners in the intended use position. Check the applicable full standard and product instructions for the assessment being commissioned; a smooth edge alone does not resolve a moving pinch or shear hazard.
Operate the unloaded chair as instructed while observing each stage from a safe position. Do not put fingers into closing mechanisms or defeat a guard to demonstrate a problem. Where a clearance assessment is needed, use the specified probes and method through a competent assessor. Photograph the relevant mechanism at useful positions and describe the movement that brings the surfaces together.
An unclear hand-placement instruction, damaged guard and hazardous mechanism are different findings. Ask for the appropriate correction and assessment instead of treating an extra warning label as an automatic solution. A sampled functional check can expose a concern, but the design may need a broader safety evaluation before the buyer can resolve it.
Finish by Packing and Carrying the Actual Supplied Set
The carry-bag check is complete only when the inspected chair and its included parts are back inside the bag. Confirm bag identity, dimensions, closure and the location of accessories. Look for a tube end pressing into fabric, a zipper strained by the packed frame, or a strap that rubs against an exposed edge. Check handles and their stitched attachments with the complete packed set under the agreed procedure.
Packing sequence can affect fit. The Helinox Chair One guide instructs users to fold the seat, place the disassembled frame on it, roll them together and then put them into the carry bag. That sequence is specific to the model. Use the ordered chair's instructions rather than forcing the frame into the bag or omitting a part to close it.
Open the bag again after the carrying check and inspect for punctures, seam opening, broken closure parts and fresh marks on the chair. Verify that model labels and instructions agree with the packed product. If accessories are sold separately, distinguish them clearly from missing included items. Visible dampness, mold or contamination should be documented and investigated before the product is repacked.
Agree the Follow-Up from the Actual Finding
A failed frame connection, a seam opening and a torn storage pocket do not have the same consequence. Identify what the affected part does, document the observed defect and use the buyer's agreed classification and sampling plan. Keep any modified or damaged test sample identifiable, and distinguish the original result from a result obtained after repair.
TradeAider's inspection standard guidance connects inspection arrangements with customer requirements and sampling. Specify the visual sample quantity and any separate quantity for assembly, loading or destructive checks. A sampling plan does not supply the missing load, seam or clearance criteria for a camping chair.
For pre-shipment inspection, the order quantity must be 100% complete and at least 80% packed for export. Provide the chair specification, instructions, approved references, test conditions and included-parts list so the inspection can cover both use and packing.
Contact our team to arrange a camping chair inspection and confirm the checks and reporting scope for your shipment.
Frequently Asked Questions
Is the advertised weight capacity the inspection test load?
Not automatically. A capacity claim needs a supporting test basis, while the inspection method defines the load, contact area, position, duration and criteria. Request that basis and agree the factory procedure. Do not apply an arbitrary multiplier to the label or assume a brief seated trial verifies it.
Should every camping chair have a separate folding lock?
No. Securing arrangements vary by construction. Inspect the latches, braces, joints and seat attachments required by the approved design. If the expected securing function is unclear, resolve it against the drawings and instructions before concluding that either the presence or absence of a latch is acceptable.
Does a mechanical inspection prove outdoor durability?
No. Mechanical checks do not establish resistance to sunlight, moisture, corrosion or fabric ageing. Match any weather-resistance claim to suitable material or product testing and the intended exposure. Keep those results separate from the sampled chair's assembly and load observations.
Can a carry-bag defect justify corrective action?
Yes, when the bag is part of the specified product and fails an agreed requirement. Describe whether the issue prevents closure, causes loss of contents, weakens carrying attachments or is cosmetic. Its classification depends on that consequence and the buyer's criteria, rather than treating every bag defect as equally serious.

Related Articles


Grow your business with TradeAider Service
Click the button below to directly enter the TradeAider Service System. The simple steps from booking and payment to receiving reports are easy to operate.