- Über uns

- Unsere Dienstleistungen
- Ihre Branche
- Ressourcen
- Nachrichten & Blog
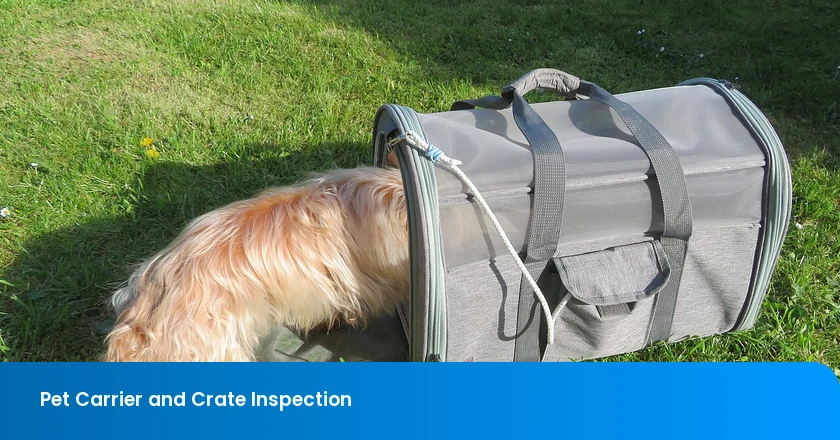
A pet carrier inspection needs to answer two different questions: does the assembled carrier meet its containment and handling requirements, and will the empty product reach the buyer with its parts and structure intact? A correct bolt count or a clean display sample cannot answer both. The relevant checks depend on the carrier’s construction, intended animal size and use; a soft carrier’s zipper and mesh seams need different methods from a rigid crate’s door hardware.
Start with These Five Carrier and Crate Checks
Use the approved drawing, production sample and instructions to check the door, escape openings, handles, ventilation and packing. Define the intended animal size and use before selecting test conditions. The airline examples below apply to the named live-animal transport context; carriers sold empty also need the applicable destination-market product requirements.
| Check | What to do | How to judge the result |
|---|---|---|
| Door and fasteners | Close the door, inspect pin engagement and hardware; apply the agreed corner-load and cycle checks. | Meet the drawing and specified functional criteria; no unintended release or unacceptable deformation. |
| Escape gaps and edges | Inspect seams, frame junctions, vents and accessible projections; check dimensions in the specified loaded condition. | Meet species/size-specific opening and edge criteria; do not substitute a smooth-looking surface for a dimensional check. |
| Handles | Confirm position and anchors; load using the defined mass, direction, duration or cycle count. | No release, cracking or deformation beyond the written limits; inspect again after unloading. |
| Ventilation | Count and measure openings on the assembled carrier, including fitted liners; check obstruction. | Meet the applicable opening distribution and area requirements; counts alone do not establish airflow. |
| Packing | Check part counts, protection, carton marks and packing against the approved sample; review any required transit test. | Correct contents and protection, intact product, identifiable batches and an applicable packaging-test result. |
Set the Product Configuration and Acceptance Criteria
Check the assembled animal-use configuration separately from the carton that protects the empty carrier during shipment. Confirm the model, construction, parts and instructions against the purchase specification before testing.
Agree the sample allocation, loads, gauges and acceptance limits before the visit. Where a method needs conditioning or laboratory equipment unavailable on site, arrange that test separately and identify the production model it covers.
Door Latches and Locking Hardware
For applicable dog-and-cat air-transport containers, IATA Container Requirement 1 requires a sliding or hinged door covering one complete end, with locking pins engaging the container by at least 1.6 cm. The door must resist bending or distortion by the animal, and all hardware and fasteners must be present and serviceable. In-cabin exceptions and operator requirements must be checked separately before applying these criteria to a soft carrier.
Compare the installed pins and fasteners with the drawing, measure engagement, and inspect bent or missing hardware. Count all required positions, including empty holes.
Fastener count, bolt pattern and removable ties
Singapore Airlines’ checked-baggage pet checklist requires at least 6 removable door fasteners: 2 at the top, 2 at the bottom and 2 at the sides. It also requires one-piece construction or a tightened nut and metal bolt in every hole joining the halves; plastic snap latches alone do not meet that operator’s requirement.
Inspect how the two halves join as well as how the door closes. Missing bolts, damaged threads and a latch that releases under the agreed load are separate findings.
Door rigidity, hinges and hardware condition
Use a buyer-agreed latch-corner force and closure-cycle screen, with recorded acceptance criteria. Observe door flex, hinge play and pin release separately from the fastener count. This inspection screen is not a prescribed IATA test or a substitute for the route’s complete requirements. Photograph the latch before loading, during the agreed check where practical, and after unloading. Record force direction, fixture, cycle count and any permanent deformation. A latch that closes on the first cycle but fails after repeated operation needs a separate finding; passing the fastener count does not clear that result.
Escape Gaps at Every Potential Exit
IATA’s cargo acceptance checklist checks whether construction and handholds or lifting devices are adequate, and whether the container is leak and escape proof. For a factory inspection, containment needs to be examined at the actual openings: the door, panel seams, zippers, mesh and tray junctions. A closed door does not establish that every other exit remains secure under the specified conditions.
Walk the carrier and list every opening before you measure any of them: the door frame, the seam where two panels meet, the zip run on a soft carrier, the mesh around a vent, the gap under a tray, the joint between a top and a base.
The openings that let a head or paw through
IATA Container Requirement 1 addresses dogs and cats directly: ventilation openings must prevent the animal’s nose or paws protruding, and the interior must be smooth without projections that the animal can bite or scratch and damage. Inspect vent edges, door junctions and internal fasteners against that animal-specific design requirement, and record sharp or accessible projections separately from lock strength.
Check a suspected entrapment point against the animal size and required opening design, rather than accepting a smooth-looking edge alone.
Soft-sided carriers: zippers, mesh and frame collapse
For soft-sided carriers, inspect the zipper run, stitched mesh seams and frame under the agreed deformation conditions. A zipper can separate locally, a seam can open under load, or a flexible frame can enlarge a gap. Record the observed condition and compare it with the approved sample rather than inferring strength from appearance.
Check zippers, mesh seams and frame deformation separately. Measure suspected openings while the wall is displaced under the agreed method, then compare the relaxed and loaded conditions. Do not assume that a soft carrier will collapse or that a rigid-crate method suits it.
Handle Load and Handling Strength
Check handle position and attachment on the assembled carrier. Singapore Airlines’ checked-baggage checklist places handling spacer bars or handles along the middle of both long sides. IATA also requires appropriate handles so handlers can move the container without being scratched or bitten. These placement requirements do not define a universal lifting load.
Set defect classes and test criteria before loading the handle. Inspection-standard guidance explains the general classification approach; the product brief must still define the load and method.
Set the rated load before the visit, not during it
Specify the handle test load and permitted response in the inspection brief. The container references cited here do not provide one universal test mass, duration or cycle count. Confirm whether the product’s declared capacity refers to the animal alone or the complete loaded carrier before selecting a method.
Include the carrier and intended contents in the loaded mass. Identify the grip, direction, hold time or cycle count and unloading condition so another inspector can repeat the check.
Where the load actually goes
Inspect the grip and its attachment to the frame, molded boss or wire. During the specified loading method, look for anchor movement, cracking and deformation; record whether these remain after unloading. A static screen does not establish a certified dynamic carrying rating. Investigate any result outside the agreed limits before shipment.
Ventilation Openings and Blocked-Air Failures
Ventilation checks need opening area, distribution and obstruction assessed in the animal-use configuration. A fitted tray, liner or panel can change which openings remain unobstructed, as can the specified transport arrangement. Retail boxes and export cartons protect empty carriers during delivery; their covering of vents is not an animal-use ventilation failure. Never assess live-animal airflow with the animal enclosed in the retail shipping carton.
Check that each wall has the openings your specification names, that they are spaced so none is blanketed by a panel seam, and that the assembled animal-use configuration leaves them unobstructed. Opening count and area are geometric checks; they are not a measured airflow rate.
Record Opening Count and Ventilation Area
Record opening distribution and area separately. Singapore Airlines’ checklist calls for at least four ventilation openings at four sides. IATA Container Requirement 1 specifies total ventilated area of at least 16% of the total surface area of all four sides, with the required distribution. Its in-cabin acceptance checklist also checks 16% ventilation and ventilation on all four sides. Use the applicable document to define the calculation, recording both the opening area and reference area; do not turn the aggregate threshold into 16% on every wall.
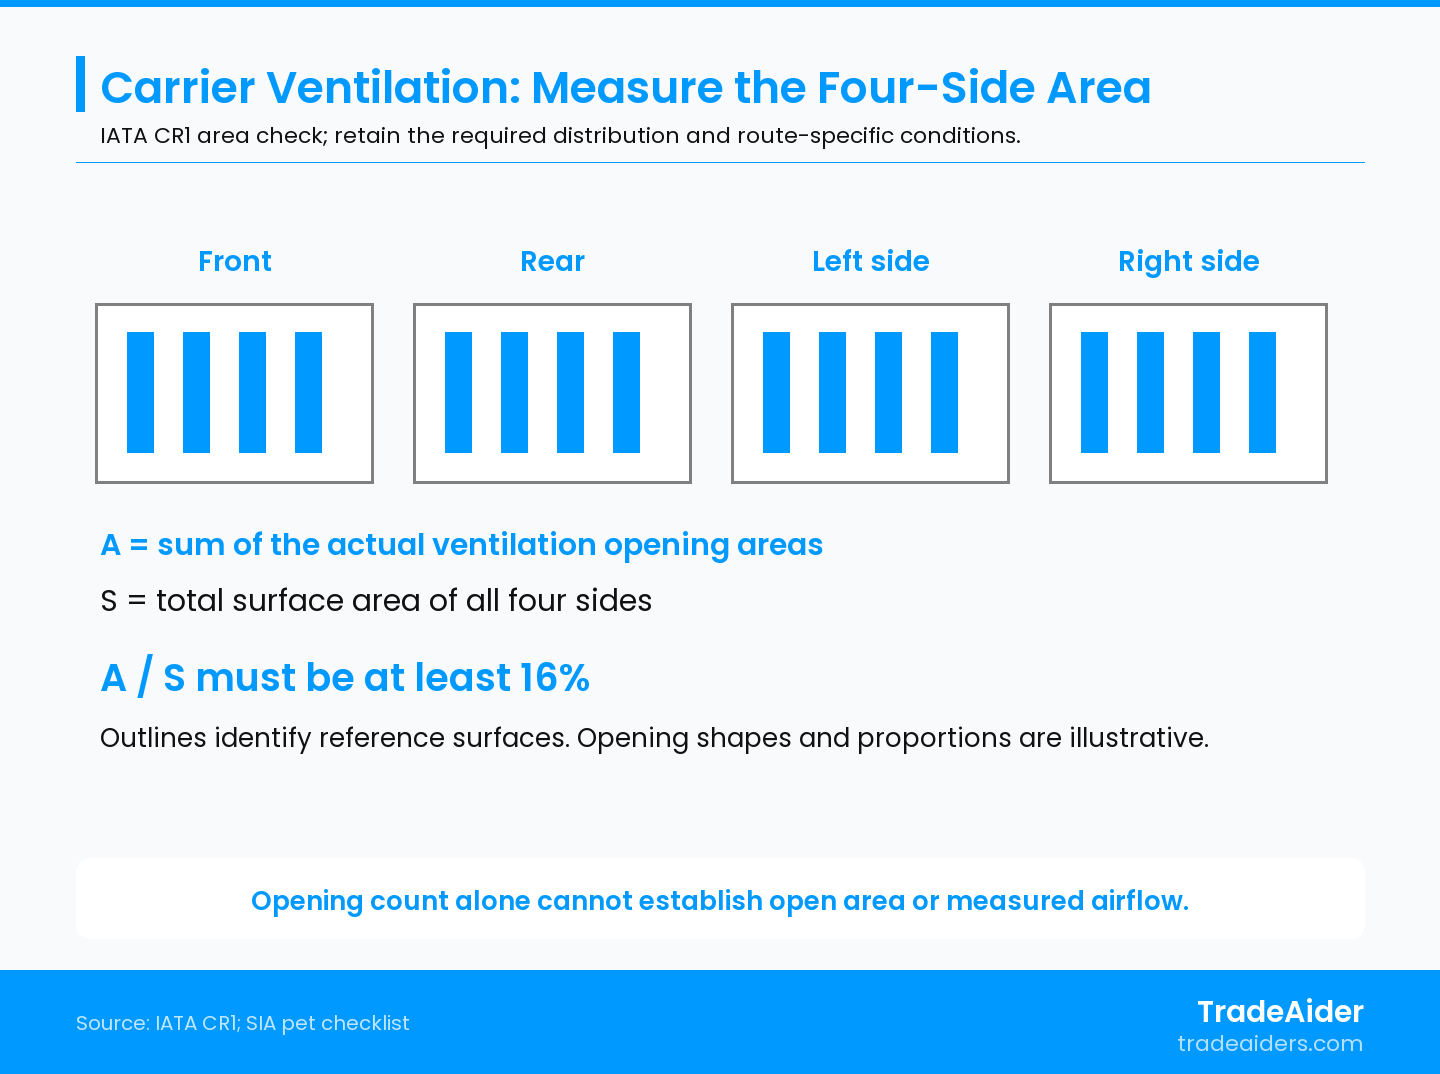
For the IATA CR1 aggregate-area check, use the total surface area of all four sides as the denominator. The drawn openings are illustrative; apply the required distribution and route conditions.
Why "airline approved" is not one global standard
Opening count and area can be simultaneous route requirements. Verify an airline-approval claim against the named operator’s published acceptance document, not the product listing alone.
IATA’s Live Animals Regulations are an industry reference used for animal transport. The container extract cited here is the 52nd edition, January 2026. Requirements applied by the carrier still need confirmation for the actual route and animal, and they do not by themselves establish destination-market legal compliance.
Record the carrier, itinerary, animal and container model on the acceptance file. A general supplier approval claim cannot show which route-specific requirement was actually checked.
Carton Protection and Transit Performance
Check the empty carrier’s packing against the approved packout: count accessories, inspect separators and edge protection, and examine the product for rubbing, cracks or distortion. A laboratory distribution test addresses a different question. ASTM D4169-23 evaluates shipping units through a defined distribution sequence, keeping the unit closed until the sequence is complete when used as a performance test. Its result does not establish the strength of an untested door latch. Use the edition agreed in the packaging test plan; D4169-23 is a historical edition, not a claim that it is the latest release.
So book the packaging evaluation and the carrier checks as two activities, and ask for the record of each. A pre-shipment inspection covers the packed goods in front of the inspector; a packaging test covers a sample of the shipping unit in a laboratory.
Ask for a named test plan, not a durability claim
Name the procedure and the route, because "drop tested" hides the variables that decide the result. The ISTA procedure catalogue separates 1-series integrity tests, which challenge the product and package without simulating a distribution environment, from 3-series general simulation tests, and warns that 7-series development tests are not intended to evaluate the protection afforded packaged products. For an imported order, Project 3M is the one written for packaged products moving from Asia-Pacific manufacturing sites to a US distribution or fulfilment centre. Ask which procedure was run, at what level, and on which production lot, and treat a development test as a design comparison rather than as proof of protection.
Identify Cartons and Trace Affected Components
Compare unit and carton marks with the packing list and production records. If a latch or frame defect is limited to a component batch, verify which cartons contain it. A packing list alone cannot establish that the other cartons are unaffected; retain all potentially affected units until the boundary is supported by records.
Check the marks on the units the inspection sampled, not on the top of the stack, and confirm that the marking method survives the packaging test you asked for.
Sampling, Defect Classes and the Limits of AQL
Acceptance quality limit (AQL) indexes an attribute-sampling plan; it is not the maximum defect percentage allowed in every individual sample. A functional observation can be classified as conforming or nonconforming and sampled. For safety or containment failures, specify the test method, sample allocation and rejection rule explicitly rather than treating a workmanship pass as evidence that the function is safe.
Agree defect classes and the sampling plan before the visit. Cosmetic and functional attributes can both be evaluated on samples, but a serious safety finding calls for the explicit hold rule in the inspection brief. Use the AQL calculator for the agreed workmanship plan; separately state any conditioning, destructive-test allocation and acceptance numbers for functional checks. A zero-acceptance sample result does not prove every unsampled unit is safe.
Illustrative Example: Correct Hardware, Failed Containment
This hypothetical example shows why a fastener count and a functional check can produce different results.
A Door Release and a Soft-Carrier Seam Opening
A pet-product brand orders 1,200 rigid dog crates and 3,000 soft carriers in 96 master cartons from two factories for the US and EU. These quantities and findings are illustrative, not measured client data.
The order is complete and packed. One factory has changed the latch-insert supplier; the other has submitted an unapproved soft-carrier frame with thinner walls. The buyer asks the inspector to compare production units with the approved samples.
Six of 40 sampled rigid doors open at the latch corner under the agreed check force, despite apparently correct bolts and pin engagement. Two of 30 soft carriers admit a documented buyer-approved gauge through the top mesh seam under the agreed force; their frame corners also appear thinner than the approved sample.
The rigid-door result fails the specified closure check even though the hardware count passes. The soft-carrier result fails the specified opening check. The component changes warrant investigation, but these observations alone do not establish the root cause of either failure.
After investigating, the factories restore the approved latch inserts and frame construction. Retest the corrected rigid crates with the closure method and the corrected soft carriers with the seam/deformation method. Identify the corrected units and cartons; neither component replacement nor a packing check closes the functional findings on its own. This is a hypothetical example, not a measured defect rate or proof of a particular root cause.
When the Affected Cartons Cannot Be Identified
In this example, packing lists exist but the factories cannot link latch inserts or frames to carton numbers. Hold all potentially affected units until segregation or complete correction identifies the relevant range. Record replacement-component batches, correction dates and reinspection results against those cartons. Passing a few corrected samples does not establish that the unexamined remainder is unaffected.
Prepare the Inspection Brief and Follow Up on Failures
Send the SKU, approved sample, construction drawing, intended animal size, destination, claimed transport route, test methods and schedule. Include the sampling plan and response to an unacceptable closure, opening or handle result.
TradeAider’s pre-shipment inspection takes place when 100% of the order is complete and at least 80% is packed. Provide the agreed loads, dimensions and acceptance criteria before booking so the inspector can check production units using the specified methods.
Record a failure before adjusting the product. Ask the supplier to investigate, approve the correction and repeat the relevant method on identified corrected units. Resolve outstanding compliance or laboratory results before making the lot decision. Contact TradeAider about a pet carrier inspection with the model, packing readiness and proposed test scope.
Frequently Asked Questions
Does a pet carrier pre-shipment inspection prove airline approval?
No. An inspection can verify the agreed product and operator requirements, but acceptance for travel remains the airline’s decision for the actual animal and route. Treat an airline-approved label as a claim to investigate: obtain the named operator’s current document, specify which items the inspection covers, and confirm the remaining acceptance conditions separately.
Is a soft carrier held to the same checks as a rigid crate?
Use construction-specific methods for soft carriers and rigid crates, while checking both for secure closure and unacceptable escape openings. On a soft carrier, inspect zippers, stitched mesh seams and frame deformation under the agreed conditions. On a rigid crate, inspect door hardware, the joint between the halves and handle anchors. Define each method and its criteria in the brief; the presence of a flexible frame alone does not establish a failure.
How should a buyer set a handle load?
Clarify whether the declared capacity covers the animal alone or the complete loaded carrier, then agree the test mass and method with the supplier before the visit. The cited container references do not set a universal lifting load. Specify the grip, pull direction and duration or cycle count. For a carrier with multiple handles, state whether the check loads one handle or the intended handle combination; those configurations are not interchangeable.
How many carriers should the latch check cover?
Set the number in the agreed functional test plan. It may share units with the workmanship sample when the method permits, or need separately conditioned or destructively tested units. State the method, number of units and rejection rule before the visit; explain what one failure means for the affected batch.
Verwandte Artikel
Erweitern Sie Ihr Unternehmen mit TradeAider Service
Klicken Sie auf die Schaltfläche unten, um direkt in das TradeAider Service System zu gelangen. Die einfachen Schritte von der Buchung und Zahlung bis zum Erhalt der Berichte sind leicht zu bedienen.